Working with HTML
Web pages are written using the HyperText Markup Language (HTML), the current version of which is HTML 5. They can be written using any standard text editing program, although there are a number of free programs available that are specifically designed to make the process of writing HTML code easier (we use Arachnophilia, a Java-based code editor written and maintained by Paul Lutus).
The elements that define the structure and content of a web page are called tags. A tag consists of the name of the tag enclosed within angle brackets (e.g. <tagname>). Each tag may optionally contain one or more attributes. Each attribute is identified by its attribute name, which is followed an equals sign (=) and a value enclosed within double quotation marks ("").
Most tags (though not all) consist of an opening tag and a closing tag. The closing tag is identified by a solidus (forward slash) immediately following the opening angle bracket. A typical tag set might look like this:
<tag-name attr-name1="value1" attr-name2="value2" . . . >
. . . something goes here . . .
</tag-name>
Unlike its predecessor XHTML, HTML 5 does not require HTML code to conform to the strict rules of XML. We have nevertheless elected to adopt some of the conventions of XHTML, because we feel they encourage good practice. For that reason, all all identifiers (tag names and attribute names) will appear in lower case. The use of a closing tag is also optional in most cases, but we will always use one for non-empty tags because we feel it is good practice to do so.
We have however decided that, going forward, we will not close empty tags by using what the W3C refers to as "self-closing tag syntax" - the use of a space followed by a forward slash immediately preceding the closing angle bracket. We have made this decision because, although the W3C have stated that "The self-closing tag syntax may be used", their HTML validator now throws up the following warning for HTML5 code each time it encounters this syntax:
"Trailing slash on void elements has no effect and interacts badly with unquoted attribute values."
Before we get started, create a folder called htdocs on your hard drive, or on an external disk drive or flash drive to hold your HTML documents and related files. This folder will represent the root directory (i.e. the top-level directory) of your website. You can give the folder a different name if you wish, but this is the name we will use from now on when referring to the root directory. Be sure to make a note of the folder's location.
Create a new file in your chosen text or HTML editor and enter the following code, exactly as shown:
<!doctype html>
<html lang="en">
<head>
<meta charset="utf-8">
<title>A title goes here</title>
</head>
<body>
<h1>This is a Level 1 Header</h1>
<p>Some text goes here</p>
</body>
</html>
Save the file with the filename template.html in your htdocs (or whatever you have chosen to call it) folder. Note that HTML file names (usually) have the extension .html. They should always be written using lower case alpha-numeric characters. Spaces and special characters should not be used (although a dash or an underscore is permitted).
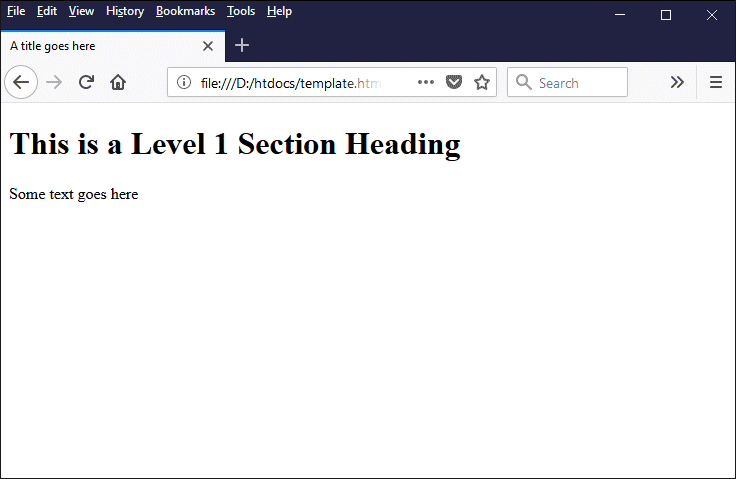
Once you have saved the file, navigate through your file system to wherever you created the htdocs folder and double-click on the file template.html. The page should open in your default browser, and you should see something like the following:

Your web page should like something like this
Let's look at what the various bits of markup have done. Here is the doctype header:
<!doctype html>
The doctype declaration will be the first thing that appears in your HTML document. It is a document header rather than an HTML tag as such; its function is to tell the web browser what kind of document it is looking at (in this case, an HTML document). In previous versions of HTML, the doctype declaration would have been much longer because it had to contain a reference to a specific document type definition (DTD), and often included a system identifier (the URL of the document type definition's formal specification).
Modern browsers support HTML 5 and will render your HTML 5 pages in "standards mode" - because they will assume that the document's markup conforms to current W3C specifications. The mode used by the browser for web pages written in older versions of HTML will depend primarily on the document type definition specified in the doctype header.
Essentially, if the page is written in any version of HTML older than HTML 4.01, or if the doctype header is omitted, it will be rendered in "quirks mode", whereby the browser assumes that the HTML document does not conform to current web standards with regard to layout and emulates non-standard behaviour.
Pages written in HTML 4.01 will be rendered in "standards mode", "almost standards mode" or "quirks mode", depending on (among other things) whether or not the document type definition includes the system identifier. The "almost standards mode" is employed where the document type is deemed by the browser implementation to have only a few (minor) "quirks".
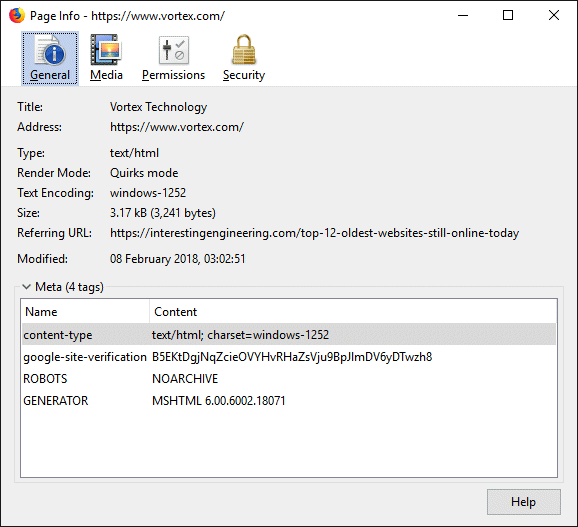
If you open a web page with the Firefox web browser, right-clicking on a blank area of the page brings up a context menu. Selecting the "View page info" option displays a window that lists various items of information about the page, including the render mode used.
The first HTML tag in our page is the html tag:
<html lang="en">
...
</html>
The html element is the root (top-level) element of an HTML document. All other elements in an HTML document will be found between the opening and closing html tags. Note the use of the lang attribute within the opening html tag. The W3C recommends the use of this attribute to declare the primary language for a web page. According to the W3C Internationalization specification:
"Browsers and other applications can use information about the language of content to deliver to users the most appropriate information, or to present information to users in the most appropriate way. The more content is tagged and tagged correctly, the more useful and pervasive such applications will become."
The first HTML tag to appear inside the root element is the head tag:
<head>
...
</head>
The contents of the head element are not displayed in the browser window when a HTML document is opened. The purpose of the head element is to provide information (metadata) about the document, including the document's title. It can also contain hypertext links to external files containing scripts and style sheets that will be used by the document.
Inside the head element we have two tags. The first of these is a meta tag:
<meta charset="utf-8">
We will be looking at meta tags in more detail elsewhere, but essentially each meta tag provides information (metadata) about some aspect of an HTML document. In this instance the meta tag is telling the browser that the document uses the UTF-8 character encoding scheme. Meta tags are always identified as such using the meta keyword.
The second tag inside the head element is the title tag:
<title>A title goes here</title>
The purpose of this tag is fairly self-explanatory - it contains a title for our web page. The title is not displayed in the main browser window, but it will appear in the browser tab belonging to the web page, just above the main browser window.
Immediately below the head element, we find the body element - which makes sense when you think about it!
<body>
...
</body>
The contents of the body element include all of the elements (text, images etc.) that will be displayed in the browser's main window when your page is rendered by the browser. They may also include some elements that are not displayed, like embedded scripts and style information, but which will nevertheless influence the appearance or behaviour of your page in some way.
We only have two elements in the body of our page. The first is a heading element:
<h1>This is a Level 1 section heading</h1>
The h1, h2, h3, h4, h5 and h6 tags are used to define section headings in an HTML document. The tags h1 - h6 represent six levels of section heading, with h1 representing the highest level and being displayed with the largest font size, and h6 representing the lowest level and being displayed with the smallest font size.
The final element in the body of our HTML document is the paragraph (p) element:
<p>Some text goes here</p>
The opening and closing paragraph tags are used to enclose any block of text that should be displayed as a paragraph. The browser will automatically add some space above and below the included text to give it the appropriate amount of vertical separation from the HTML elements immediately above or below it.
You may have noticed from examining the markup code that HTML elements that are nested within other HTML elements are indented to a degree which reflects the level of nesting. The indentation has absolutely no effect whatsoever on how the web page will be displayed, but it serves to highlight the structure of the document and makes the code easier to read.
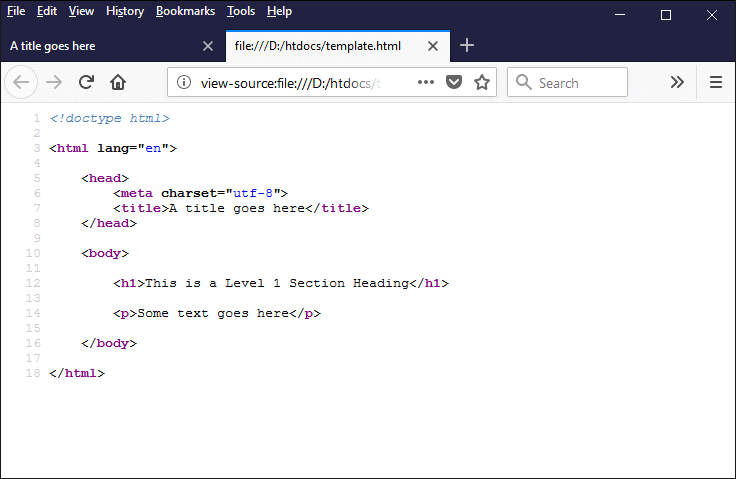
Note that most web browsers will allow you to view a web page's HTML. In Firefox, for example, simply right-click in a blank area of the page and select "View page source", and a new tab will open to display the page's HTML code.

Most browsers allow you to view a web page's HTML code

