| Author: | |
| Website: | |
| Page title: | |
| URL: | |
| Published: | |
| Last revised: | |
| Accessed: |
Data validation is the process of ensuring, at least as far as is possible, that the data given to a program by a user or from a file (essentially, the program's input) is of the correct type, and in the correct format. Although the programmer will obviously take every precaution to ensure the correct operation of the program, and will attempt to eliminate bugs that could cause a problem through a rigorous process of testing, they have no real control over mistakes made by the user during data entry. Nor can they guarantee that any data files used by the program will be free of errors and in the correct format.
There are however measures that can be taken to restrict the program's input to valid data. Such measures involve the application of validation rules to any data being input to the program. Input not meeting the program's requirements (i.e. input that does not obey the validation rules) can be dealt with in a pre-defined way, and will not cause the program to crash or produce spurious output. Data validation rules can also make an application more user friendly, since they enable the program to warn the user immediately when there is a problem rather than simply allowing them to continue entering data until the program crashes or some other problem occurs.
The validation rules used will depend on the application, and in particular on the type of data being input to the program. Database management systems like Oracle or Microsoft Access provide extensive facilities for creating data validation rules. For our Visual Basic applications, we will need to work a little harder to ensure that the input is valid, because we will need to define and code our own validation rules.
In a software project of any size, the task of determining what is and what isn't valid data is usually undertaken long before any code is written, and is part of an initial requirements analysis phase. Even so, we can think in general terms about the kind of data validation required for a typical application, and how it might be implemented. Some common data validation requirements are outlined below.
There are many ways in which validation can be carried out, and it is down to analysts and software developers to decide what kind of validation is required and how to implement it. To demonstrate some simple validation techniques, we will create a data entry form of the type typically found on a web page. Proceed as follows:
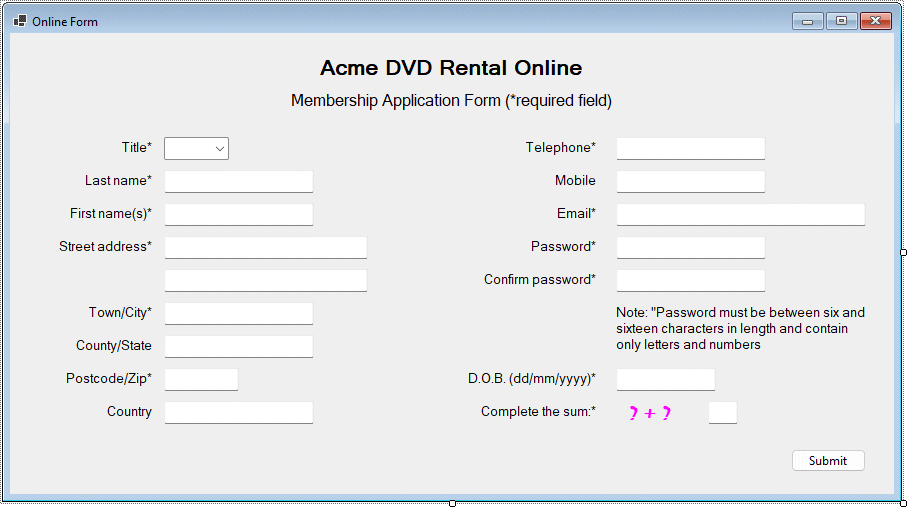
The OnlineForm application interface
| Control | Properties |
|---|---|
| Form | Name: frmOnlineForm Size: 900, 500 Text: "Online Form" |
| Label | Name: lblFormTitle AutoSize: False Font: Microsoft Sans Serif, 16pt, style=Bold Location: 305, 22 Size: 275, 25 Text: "Acme DVD Rental Online" |
| Label | Name: lblApplicationForm AutoSize: False Font: Microsoft Sans Serif, 12pt Location: 277, 57 Size: 330, 20 Text: "Membership Application Form (*required field)" |
| Label | Name: lblTitle AutoSize: False Font: Microsoft Sans Serif, 10pt Location: 21, 104 Size: 125, 20 Text: "Title*" TextAlign: MiddleRight |
| Label | Name: lblLastName AutoSize: False Font: Microsoft Sans Serif, 10pt Location: 21, 137 Size: 125, 20 Text: "Last name*" TextAlign: MiddleRight |
| Label | Name: lblFirstName AutoSize: False Font: Microsoft Sans Serif, 10pt Location: 21, 170 Size: 125, 20 Text: "First name(s)*" TextAlign: MiddleRight |
| Label | Name: lblAddress AutoSize: False Font: Microsoft Sans Serif, 10pt Location: 21, 203 Size: 125, 20 Text: "Street address*" TextAlign: MiddleRight |
| Label | Name: lblTown AutoSize: False Font: Microsoft Sans Serif, 10pt Location: 21, 269 Size: 125, 20 Text: "Town/City*" TextAlign: MiddleRight |
| Label | Name: lblCounty AutoSize: False Font: Microsoft Sans Serif, 10pt Location: 21, 302 Size: 125, 20 Text: "County/State" TextAlign: MiddleRight |
| Label | Name: lblPostcode AutoSize: False Font: Microsoft Sans Serif, 10pt Location: 21, 335 Size: 125, 20 Text: "Postcode/Zip*" TextAlign: MiddleRight |
| Label | Name: lblCountry AutoSize: False Font: Microsoft Sans Serif, 10pt Location: 21, 368 Size: 125, 20 Text: "Country*" TextAlign: MiddleRight |
| Label | Name: lblTel AutoSize: False Font: Microsoft Sans Serif, 10pt Location: 450, 104 Size: 140, 20 Text: "Telephone*" TextAlign: MiddleRight |
| Label | Name: lblMob AutoSize: False Font: Microsoft Sans Serif, 10pt Location: 450, 137 Size: 140, 20 Text: "Mobile" TextAlign: MiddleRight |
| Label | Name: lblEmail AutoSize: False Font: Microsoft Sans Serif, 10pt Location: 450, 170 Size: 140, 20 Text: "Email*" TextAlign: MiddleRight |
| Label | Name: lblPassword AutoSize: False Font: Microsoft Sans Serif, 10pt Location: 450, 203 Size: 140, 20 Text: "Password*" TextAlign: MiddleRight |
| Label | Name: lblConfirmPasword AutoSize: False Font: Microsoft Sans Serif, 10pt Location: 450, 236 Size: 140, 20 Text: "Confirm password*" TextAlign: MiddleRight |
| Label | Name: lblDOB AutoSize: False Font: Microsoft Sans Serif, 10pt Location: 450, 335 Size: 140, 20 Text: "D.O.B. (dd/mm/yyyy)*" TextAlign: MiddleRight |
| Label | Name: lblCatchpa AutoSize: False Font: Microsoft Sans Serif, 10pt Location: 450, 368 Size: 140, 20 Text: "Complete the sum:*" TextAlign: MiddleRight |
| Label | Name: lblPasswordNote AutoSize: False Font: Microsoft Sans Serif, 10pt Location: 603, 269 Size: 261, 53 Text: "Note: "Password must be between six and sixteen characters in length and contain only letters and numbers" TextAlign: MiddleLeft |
| Label | Name: lblSum AutoSize: False Font: Mistral, 16pt, style=Bold Forecolor: Fuchsia Location: 606, 369 Size: 70, 23 Text: "? + ? =" TextAlign: MiddleCenter |
| ComboBox | Name: cmbTitle Location: 154, 104 Size: 65, 23 |
| TextBox | Name: txtLastName Location: 154, 137 Size: 150, 23 |
| TextBox | Name: txtFirstName Location: 154, 170 Size: 150, 23 |
| TextBox | Name: txtAddress01 Location: 154, 203 Size: 204, 23 |
| TextBox | Name: txtAddress02 Location: 154, 236 Size: 204, 23 |
| TextBox | Name: txtTown Location: 154, 269 Size: 150, 23 |
| TextBox | Name: txtCounty Location: 154, 302 Size: 150, 23 |
| TextBox | Name: txtPostcode Location: 154, 335 Size: 75, 23 |
| TextBox | Name: txtCountry Location: 154, 368 Size: 150, 23 |
| TextBox | Name: txtTelephone Location: 606, 104 Size: 150, 23 |
| TextBox | Name: txtMobile Location: 606, 137 Size: 150, 23 |
| TextBox | Name: txtEmail Location: 606, 170 Size: 250, 23 |
| TextBox | Name: txtPassword01 Location: 606, 203 Size: 150, 23 UseSystemPasswordChar: True |
| TextBox | Name: txtPassword02 Location: 606, 236 Size: 150, 23 UseSystemPasswordChar: True |
| TextBox | Name: txtDOB Location: 606, 335 Size: 100, 23 |
| TextBox | Name: txtSum Location: 698, 368 MaxLength: 10 Size: 30, 23 |
| Button | Name: cmdSubmit Location: 781, 416 Size: 75, 23 Text: Submit |
Note that the last box requires the user to input the result of a simple sum (randomly generated) to prevent web robot programs from hijacking the form. The popular term CAPTCHA (an approximate abbreviation of Completely Automated Public Turing Test To Tell Computers and Humans Apart) is often used to describe this kind of validation. The idea is that a human being will be able to solve a relatively easy arithmetic problem whereas a robotic program would not even recognise it as such (in a real-world implementation the sum would not only be randomly generated, but would be presented as a slightly distorted or noisy image in order to prevent an intelligent robot from being able to decipher the question).
Note also that the two password text boxes should have their PasswordChar property set to "*". The main event handler on the form will of course be for the Submit button's Click event, which will check the form data for validity before sending it to the (in this case imaginary) server application. There will be a number of validation routines attached to other controls, however, to ensure that invalid input is handled as early as possible. The first field on the form is the cmbTitle ComboBox (we will limit the possible choices in the drop-down selection to Mr, Mrs, Miss and Ms To keep things simple).

The String Collection Editor dialog box
The MaxLength property determines the maximum number of characters that the user can enter in a field such as a text box or (in this case) combo box. We have therefore allowed the user the opportunity to enter a title that is not on the list, such as "Doctor" or "Professor", but have restricted the length of the input string to prevent abuse. Although not explicitly stated below, you should also impose appropriate limits on the input length for the remaining fields.
The password fields are a good example of a situation where you can reduce the requirements for data validation by imposing such a limit. Set the MaxLength property for each password field to 16, and your validation in terms of password length is then only required to check for a valid minimum number of characters (since the maximum number cannot be exceeded in any case). The same is true for the user's date of birth (DOB) and the CAPTCHA sum (which as you will see, can never exceed two digits).
Dim strAllowedChars As String = "0123456789() -+ "
If Len(txtTelephone.Text) = 0 Then
Exit Sub
Else
For i = 0 To Len(txtTelephone.Text) - 1
If InStr(1, strAllowedChars, txtTelephone.Text(i)) = 0 Then
MsgBox("Invalid telephone number.")
txtTelephone.Focus()
exit sub
End If
Next
End If
The event handler starts with the declaration of a local character array variable called allowedChars() that contains the characters that we will allow the user to enter as part of the telephone number. The rest of the code is taken up with an If . . . Else . . . End If statement.
If the user has not entered anything at all, the code exits the subroutine (the problem of this being a mandatory field will be dealt with separately by the Submit button's event handler, should the field remain empty when the user tries to submit the form data). Otherwise, the code loops through the input string one character at a time, to make sure that all of the characters input by the user match one of the allowed characters.
The Visual Basic Instr() function checks for the presence of one string inside another, and if it does not find it returns zero. If this occurs, the event handler will display a message to tell the user that the telephone number entered is invalid, restore the focus to the Telephone field, and exit the subroutine. Run the program and test the code by entering an invalid telephone number. You should see something like the following illustration:
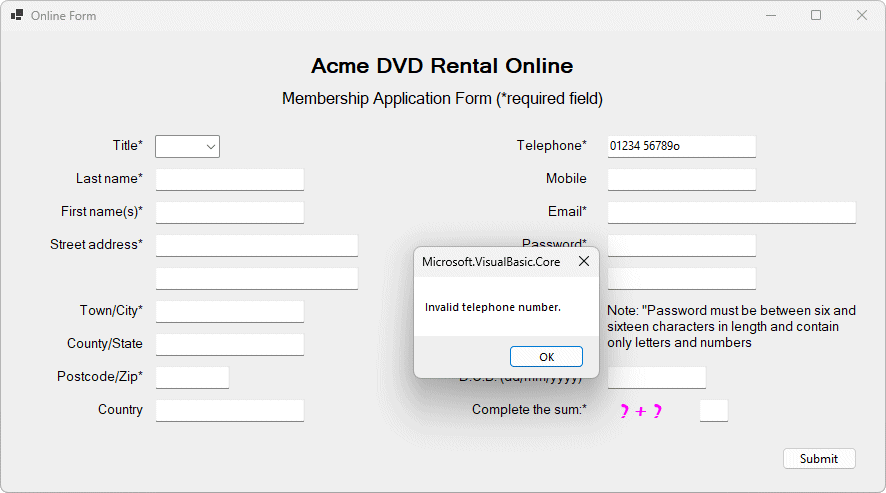
The user has typed a lower case "o" instead of a zero
Dim intAt, intDot As Integer
If Len (txtEmail.Text) = 0 Then
Exit Sub
Else
intAt = InStr(1, txtEmail.Text, "@")
intDot = InStr(intAt + 1, txtEmail.Text, ".")
If (intAt = 0) Or (intDot = 0) Or (intDot = (intAt + 1)) _
Or(InStr(intAt + 1, txtEmail.Text, "@") < 0) _
Or(Len(txtEmail.Text) < intDot + 1) _
Or(InStr(intDot + 1, txtEmail.Text, ".") < 0) Then
MsgBox("Invalid email address.")
txtEmail.Focus()
Exit Sub
End If
End If
As before, if the user has not entered anything at all, the code exits the subroutine and the mandatory field problem will be dealt with separately. The local integer variables intAt and intDot are used to store the location (returned by the InStr() function) of the first occurrence (if any) of the at sign ("@") character in the string, and the location of the first occurrence thereafter (if any) of the period (".") character.
Note that the first argument to the InStr() function specifies at what position within the target string the search starts, so any occurrence of a period before the "@" is ignored. The code essentially ensures that there is one (and only one) "@" in the string, plus at least one period in the substring that follows the "@" (but not immediately following the "@"). It also checks to make sure that at least the first occurrence of a period is followed by at least one other character.
If any of these conditions is not met, the event handler displays a message to tell the user that the e-mail address entered is not valid, restores the focus to the Email field, and exits the subroutine. As before, run the program and test the code by entering an invalid e-mail address, but be aware that the validation provided here is very rudimentary - it is perfectly possible to enter an invalid email address that does not trigger an error message. To implement a comprehensive validity check for email addresses would require considerably more code!
We turn next to the password field. The constraints on the password field are such that is easier to validate user input. All characters entered must be alphanumeric, and there must be at least six characters but no more than sixteen characters.
Dim n As Integer
If Len(txtPassword01.Text) = 0 Then
Exit Sub
ElseIf Len(txtPassword01.Text) < 6 Then
MsgBox("Invalid password")
txtPassword01.Clear()
txtPassword01.Focus()
Exit Sub
Else
For i = 0 To Len(txtPassword01.Text) - 1
n = Asc(txtPassword01.Text(i))
If(n < 48) Or ((n > 57) And (n < 65)) Or ((n > 90) And (n < 97)) Or (n > 122) Then
MsgBox("Invalid password")
txtPassword01.Clear()
txtPassword01.Focus()
Exit Sub
End If
Next
End If
The txtPassword control's LostFocus event handler declares a local integer variable (n) to hold the ASCII codes returned by the Asc() function. As with the previous event handlers, the code exits the subroutine immediately if the text box is empty, and the mandatory field situation is dealt with elsewhere.
If the user has entered a password, the next part of the code checks whether or not the six character minimum requirement has been met. If not, a message is displayed telling the user that the password is invalid, the text box is cleared, and the focus is restored to the text box.
The final part of the code (which executes if the password is six characters or more in length) loops through each character in the password to check that it is either an upper or lower case letter or a number. If not, the user will see a message telling them that the password is invalid, the text box is cleared, and the focus is restored to the text box.
Since the sole requirement of the second password text box is that the contents should be identical to the first, the code is somewhat simpler.
If Len(txtPassword02.Text) = 0 Then
Exit Sub
ElseIf txtPassword02.Text <> txtPassword01.Text Then
MsgBox("Passwords do not match - please re-enter.")
txtPassword01.Clear()
txtPassword02.Clear()
txtPassword01.Focus()
End If
The event handler here simply compares the two password strings to see if they match (note that the comparison is case sensitive). If they do not, a message is displayed informing the user of this fact, both password boxes are cleared, and the focus reverts to the first password box.
The next piece of validation code must check to see whether the user has input their date of birth in the correct format:
dd/mm/yyyy.
If Len(txtDOB.Text) = 0 Then
Exit Sub
ElseIf Len(txtDOB.Text) < 10 Then
MsgBox("You have entered an invalid or incorrectly formatted date.")
txtDOB.Focus()
ElseIf IsDate(txtDOB.Text) = False Or txtDOB.Text(2) <> "/" Or txtDOB.Text (5) <> "/" Then
MsgBox("You have entered an invalid or incorrectly formatted date.")
txtDOB.Focus()
ElseIf DateTime.Parse(txtDOB.Text) > Now.Date Or DateTime.Parse(txtDOB.Text) _
<DateTime.Parse("01/01/1900") Then
MsgBox("The date you have entered is outside the acceptable range.")
txtDOB.Focus()
End If
As before, the validation here is not concerned with the absence of data, so an empty text box causes the code to exit the subroutine. If data has been entered, the code checks to see if that the correct number of characters has been used. If not, the user sees a message telling them the date is invalid or incorrectly formatted, the focus is returned to the D.O.B. text box, and the subroutine ends.
If the correct number of characters has been entered, the code will check to see if the characters entered represent a valid date using the isDate() function. It also checks to see if the the specified separator ("/") has been used between day (dd), month (mm) and year (yyyy). If the input is not a valid date, or is not in the required format, the user is advised that the date is invalid or incorrectly formatted, the focus is returned to the D.O.B. text box, and the subroutine ends.
The final piece of validation checks to make sure that the dates fall between the beginning of the twentieth century and the current date (in the real world, the range of acceptable dates would probably be more tightly constrained, but this example serves to demonstrate how it might work).
The final field on the form requires the user to answer a simple addition question to establish that they are not a robotic program seeking to gain access to the web server via the online form. The question itself will be randomly generated when the form loads, and will consist of an addition involving two single-digit numbers in the range 1 to 9.
The code (see below) uses the Randomize() function to initialise Visual Basic's random number generator. The Rnd() function generates random values between 0 and 1. The code generates a random number between 0 and 9 by multiplying the randomly generated value by 8 and adding 1 to the result, rounding up or down to get the nearest whole number. This guarantees that only numbers between 1 and 9 will be generated.
Public x, y As Integer
Randomize()
x = Rnd() * 8 + 1
y = Rnd() * 8 + 1
lblSum.Text = x & " + " & y & " ="
If Len(txtSum.Text) = 0 Then
Exit Sub
ElseIf(IsNumeric(txtSum.Text)) = False Then
MsgBox("You must enter a valid number.")
ElseIf CInt(txtSum.Text) <> (x + y) Then
MsgBox("The answer you have given is incorrect.")
Else
Exit Sub
End If
txtSum.Clear()
txtSum.Focus()
The event handler code above is fairly self explanatory. If the user enters an incorrect answer to the simple addition (or just complete garbage!) , the code displays an error message, clears the user's answer, and returns the cursor to the text box.
The code we have written so far covers various kinds of user input error that can occur for different input boxes. We still have to deal with the general case of required fields not being completed at all, and we will do this when the user clicks on the Submit button.
If cmbTitle.Text = "" Then
MsgBox("You have not completed the Title field. This is a mandatory field.")
cmbTitle.Focus()
ElseIf txtLastName.Text = "" Then
MsgBox("You have not entered your last name. This is a mandatory field.")
txtLastName.Focus()
ElseIf txtFirstName.Text = "" Then
MsgBox("You have not entered your first name(s). This is a mandatory field.")
txtFirstName.Focus()
ElseIf txtAddress01.Text = "" Then
MsgBox("Please enter the first line of your address. This is a mandatory field.")
txtAddress01.Focus()
ElseIf txtTown.Text = "" Then
MsgBox("Please enter your town/city. This is a mandatory field.")
txtTown.Focus()
ElseIf txtPostcode.Text = "" Then
MsgBox("Please enter your postal or zip code. This is a mandatory field.")
txtPostcode.Focus()
ElseIf txtCountry.Text = "" Then
MsgBox("Please enter your country name. This is a mandatory field.")
txtCountry.Focus()
ElseIf txtTelephone.Text = "" Then
MsgBox("Please enter your telephone number. This is a mandatory field.")
txtTelephone.Focus()
ElseIf txtEmail.Text = "" Then
MsgBox("Please enter your e-mail address. This is a mandatory field.")
txtEmail.Focus()
ElseIf txtPassword01.Text = "" Then
MsgBox("Please enter a password. This is a mandatory field.")
txtPassword01.Focus()
ElseIf txtPassword02.Text = "" Then
MsgBox("Please confirm your password. This is a mandatory field.")
txtPassword02.Focus()
ElseIf txtDOB.Text = "" Then
MsgBox("Please enter your date of birth. This is a mandatory field.")
txtDOB.Focus()
ElseIf txtSum.Text = "" Then
MsgBox("Please answer the simple question to verify that you are not a robot.")
txtSum.Focus()
Else
MsgBox("You have successfully submitted your details!")
End If
The Submit button's Click event handler essentially checks each input box in turn to check that it is not empty. If one of the mandatory fields is found to be empty, the user is asked to complete it.
The validation code provided for our online form is not particularly sophisticated and could certainly be improved upon. It does however manage to catch some of the more obvious input errors as they occur, rather than allowing the user to complete the form and submit the form data to a server-side script. It would be frustrating for the user to have the script return an error message after having unsuccessfully tried to process the data, and possibly have to start the entire process all over again.
Although we have used a web form as our example here, it is good practice to build validation into any kind of application that requires input from a user, or from a file. One of the best known clichés related to computing is "Garbage in, garbage out!". Taking reasonable precautions to prevent invalid data from being input to the program in the first place greatly reduces the chances of the program producing invalid output.