
| Author: | |
| Website: | |
| Page title: | |
| URL: | |
| Published: | |
| Last revised: | |
| Accessed: |

Most modern web applications store the data they collect in a database. The term "database" was coined by the Danish computer scientist Peter Naur (1928-2016), who defined the difference between a file and a database thus:
"A file may be regarded as a logical record of facts or ideas, whereas a database contains information organized so that it can be used readily and flexibly."
The data needed by a web application in order to provide services to clients includes information about the clients themselves, information about any products or services that are available to them via the web application, and information about any transactions that take place between the web application and its clients. All of this information can be stored in an organised and secure manner using a relational database.
A relational database stores information in files called tables. Each table holds information about a specific entity, such as a customer, a product, or a sales order. The tables are sometimes referred to as flat files because they are two-dimensional. In fact, you can think of a table as a two-dimensional array that stores tabular information.
Each row in a table is called a record, and holds a collection of related data items pertaining to a unique instance of a specific type of object, such as a customer, a product, or an order. each column, referred to as a field, represents a single attribute of an object, such as a customer name, a product ID, or an order number. The relationships between tables are established using key value fields. To clarify, let's think about the relationship between a customer and a purchase order.
The customer table will contain information about many customers, each of whom will have a unique customer ID. An order table will contain information about many orders, each of which will have both a unique order number and the customer ID of the customer to whom it relates. A one-to-many relationship thus exists between these two tables, because a customer can have many orders, but an order can only belong to one customer.
We're not going to go any deeper into the theory behind relational databases in this article. However, if you would like to explore the topic in more depth, take a look at the article "Relational Data Analysis" which you can find in the Systems Analysis section of this website.
In this article we will be describing how a database can be created and accessed using the Relational Database Management System (RDBMS) that is bundled with XAMPP - it's called MariaDB. There are essentially two ways in which this can be achieved. We can use the command line, or we can use the graphical phpMyAdmin user interface, which is accessible via the XAMPP control panel. We can also write PHP code that will create a database, but we won't be exploring that here.
One thing we should point out straight away, though, is that, while just about anything is possible when carrying out development using a local web server, the situation is likely to be very different if you are using a web hosting service. Most web hosting services will allow you to create a database, but will usually require you to do so using their own database management page.
The problem does not arise if you have full administrative control over the production server - i.e. the live, public-facing server that hosts your website and any database that is associated with it. Either way, once the database has been created, you should be able to make changes to it, either using PHP code or whatever database management facilities are available to you.
For all of the articles in this section, we have assumed that you are using XAMMP as your web server. That being the case you will know that current versions of XAMPP include the free and open-source MariaDB Relational Database Management System (RDBMS). The latest stable version of MariaDB at the time of writing is version 12.2.2, released in February 2026. MariaDB replaced the MySQL RDBMS in version 5.5 of XAMPP in October 2015, following the acquisition of Sun Microsystems by Oracle in 2010.
MySQL was originally developed by the Swedish company MySQL AB, founded in 1995 by Michael Widenius, David Axmark, and Allan Larsson as an open-source RDBMS. Sun Microsystems acquired MySQL AB in 2008, pledging to maintain MySQL as open-source software under the GNU General Public License (GPLv2). They could not however guarantee that future owners would be legally bound by this arrangement.
MariaDB was created in 2009 by some of the original developers of MySQL in response to Oracle's announcement that it was acquiring Sun Microsystems, primarily because there was concern at the time that Oracle's acquisition would compromise the open-source nature of MySQL, although this concern has so far proved to be largely unfounded.
MariaDB's codebase is now developed and maintained by the non-profit MariaDB Foundation and MariaDB plc, a commercial entity co-founded by Michael Widenius (formerly of MySQL AB), Patrik Backman, Max Mether and Ralf Wahlsten, that owns the MariaDB trademark and provides data storage and access services to customers around the globe.
Both MySQL and MariaDB are available as free, open-source software under the terms of the GNU General Public License (GPL), although Oracle offers a commercial version of MySQL for customers whose requirements cannot be met by the open-source version. Many organisations have now switched from MySQL to MariaDB, including the Wikimedia Foundation, Google, and Mozilla. MariaDB is also the default database for a number of major Linux distributions.
MariaDB's version of SQL is generally compatible with MySQL, so if you have previously used MySQL you shouldn't encounter any significant differences. The version of MariaDB bundled with the latest version of XAMPP is 10.4.32, which is the version we will be using to create our example databases for this article.
One final thing to note is that, despite the fact that MySQL has been replaced by MariaDB in XAMPP, there are still numerous references to MySQL in this article, which simply reflects the fact that the MariaDB development team obviously did not feel that there was any need to change the name of things like the mysql directory. In fact, the database module is still called MySQL in the XAMPP Control Panel. In a way, this makes sense, because it means that developers have little or no new terminology to learn when changing from MySQL to MariaDB.
The default collation for a database management system is the set of rules that determines how text data is sorted and compared. It specifies, for example, whether a sort is case-sensitive, or how certain special characters are ordered. You may find that, for the version of MariaDB you are currently running, the default character set is latin1 and the default collation is latin1_swedish_ci, because both MySQL and MariaDB were created by development teams based in Sweden.
You may wish to change the default collation if your database application is primarily intended for users in a specific geographical region, or who have specific requirements with regard to the handling of text data. Even if you do not have any specific requirements in mind, it is generally recommended to switch to a modern universal character set, since the latin1 character set cannot store characters that require more than three bytes of storage, and the latin1_swedish_ci collation scheme is specific to the Swedish language.
In recent versions, the default character set in most MariaDB distributions is utf8mb4 - a multibyte character set that stores characters using up to 4 bytes. The default collation appears to have been changed to utf8mb4_unicode_ci (the ci part indicate that the method of sorting is case-insensitive).
In case you need to update your server settings to use the utf8mb4 character set and the utf8mb4_unicode_ci default collation, open the XAMPP control panel and click on the MySQL Admin button as shown in the illustration below.
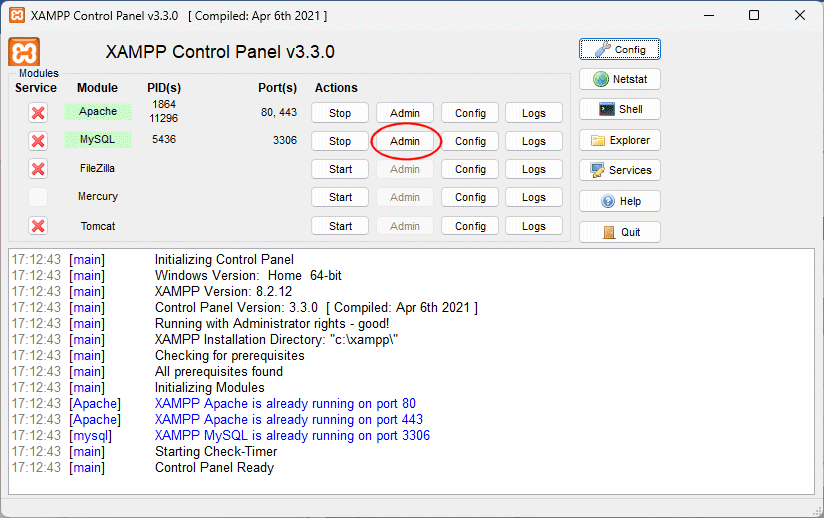
Click on the MySQL Admin button in the XAMPP control panel
Once you have the phpMyAdmin page open you should see the phpMyAdmin home page, in which you can change server settings, including the server connection collation. If this is already set to utf8mb4_unicode_ci (and assuming that's the collation you require) you do not need to take any further action. Otherwise, you can select the desired collation using the drop-down list provided, as shown in the illustration below.
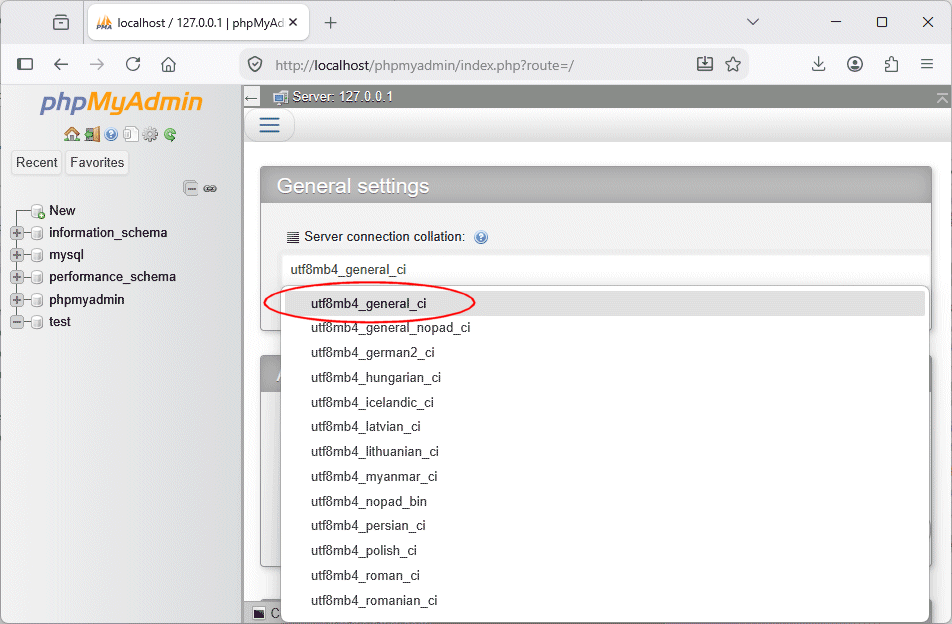
Select the required server connection collation on the phpMyAdmin home page
We will now see how to create and connect to a database using phpMyAdmin. The first thing you need to do is to open the phpMyAdmin home page from the XAMPP control panel as described above, or navigate to the page in your web browser using the URL http://localhost/phpmyadmin/ (note that both Apache and MySQL must be running in order for this to work). Click on the New icon on the left-hand column of the phpMyAdmin window. You should see something like the following:
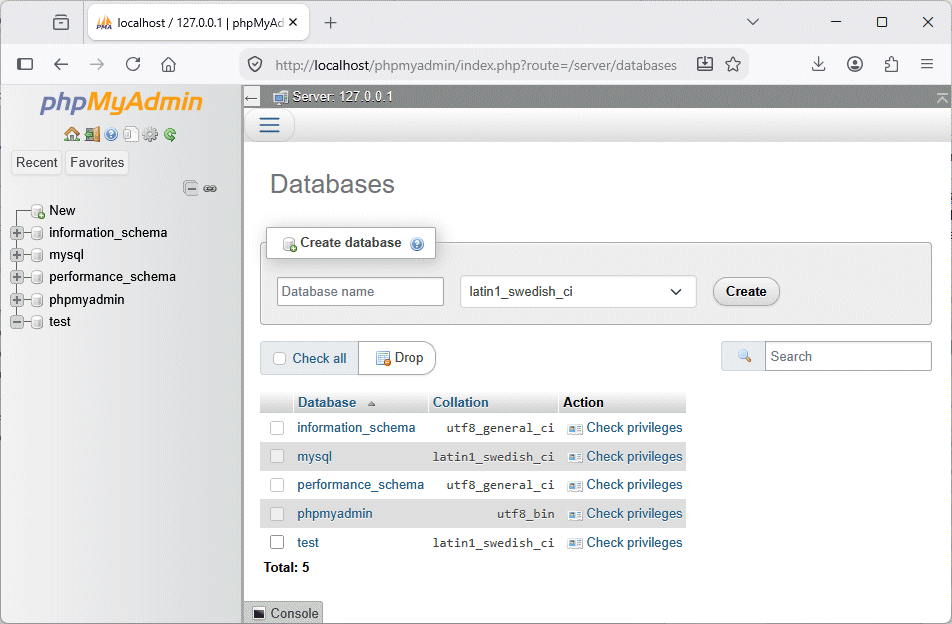
Click on the New icon to create a database
All you need to do in order to create the database is give it a suitable name, e.g. my_database. The conventions used to name a database vary. We have chosen to use all lower-case characters, and if the database name consists of more than one word, they will be separated using an underscore character. The name chosen for the database should be concise, but should also reflect the purpose of the application it supports.
Note that the default collation selected for the database will probably be latin1_swedish_ci. You should change this in order to match the default server connection collation (see above). Once you have chosen a name and a default collation for your database, create the database by clicking on the Create button. The name of the new database will appear in the list on the left-hand side of the browser window, and you will be invited to create some tables.
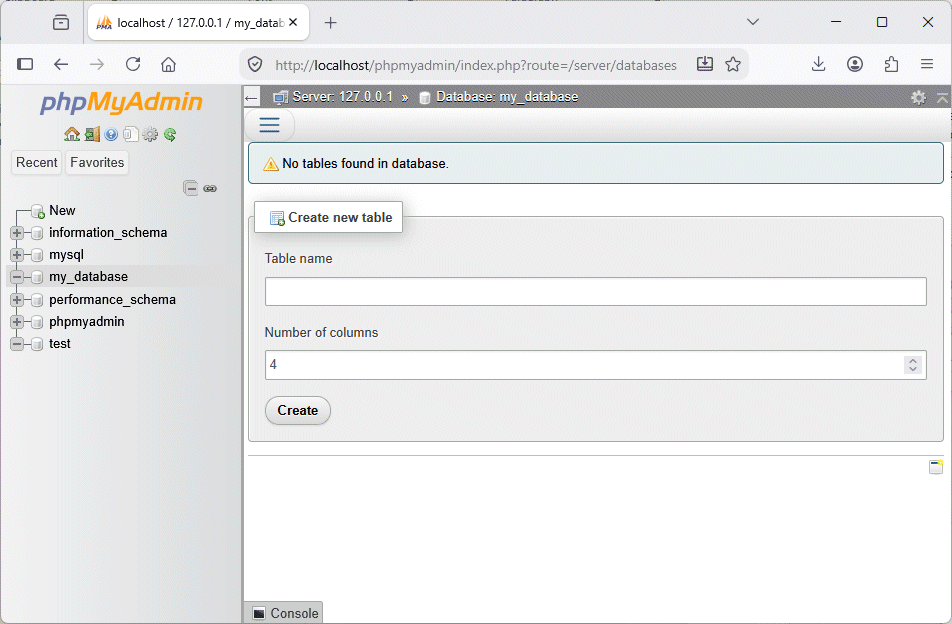
The database has been created
Obviously, the database you have just created must exist somewhere on your server, but where exactly is it? You will find it in the MySQL data folder, the location of which depends where you installed XAMPP. If you installed it in the root directory of your C: drive, you will find it in a subdirectory of C:\xampp\mysql\data\ that has the same name as your database. Note that, because we have not yet created any tables, the only file to be found in that directory at the moment is the db.opt (database options) file.
We can also create a database using MySQL commands in a command line environment. The SQL commands we are primarily interested in here form part of the Data Definition Language (DDL). These commands allow you to, among other things, create, modify or delete a database.
In order to execute MySQL commands from the command line, we first need to open a command window and navigate to the directory in which the MySQL executable files are stored (typically, this would be C:\xampp\mysql\bin). Log in to the MySQL server as the root user by entering the command:
mysql -u root
Logging into the database as the root user automatically gives you authorisation to run MySQL commands. The output you see in the command window should look something like the illustration below.
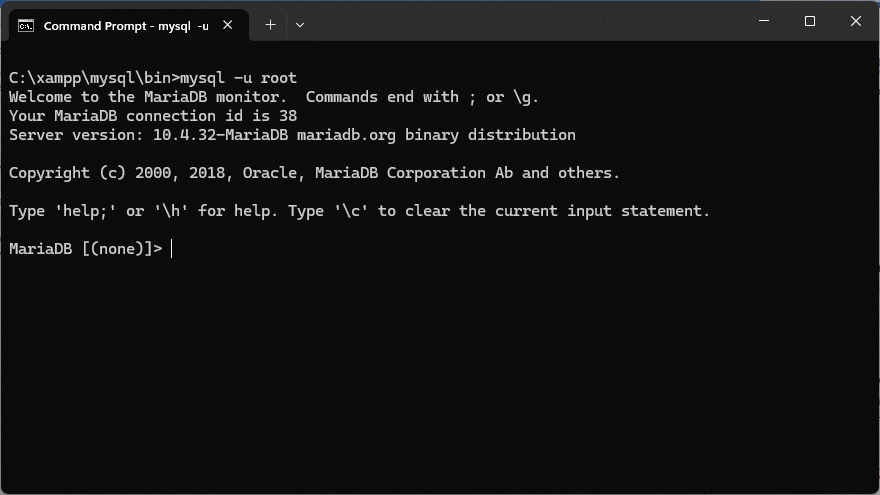
The MySQL command line environment
We can now create our new database using the following commands:
CREATE DATABASE another_database CHARACTER SET utf8mb4 COLLATE utf8mb4_unicode_ci;
CREATE USER 'webdev'@'localhost' IDENTIFIED BY 'letmein';
GRANT ALL PRIVILEGES ON another_database.* TO 'webdev'@'localhost';
FLUSH PRIVILEGES;
Let's break down what we have done here. The CREATE DATABASE command simply creates a database called another_database. The CREATE USER command creates a user called webdev with the IDENTIFIED BY command specifying the password "letmein" for that user. The GRANT ALL PRIVILEGES command assigns all privileges for another_database to the user called webdev except the privilege to use the GRANT command.
The FLUSH PRIVILIGES command tells the server to reload its grant tables (special tables that store and manage user access permissions). This is necessary if permissions have been manually changed (as is the case here) so that any additions or changes to database user accounts, including changes to passwords or user permissions, take effect immediately without having to restart the server.
If all of the above commands have been executed successfully, your command window should look like the illustration below.
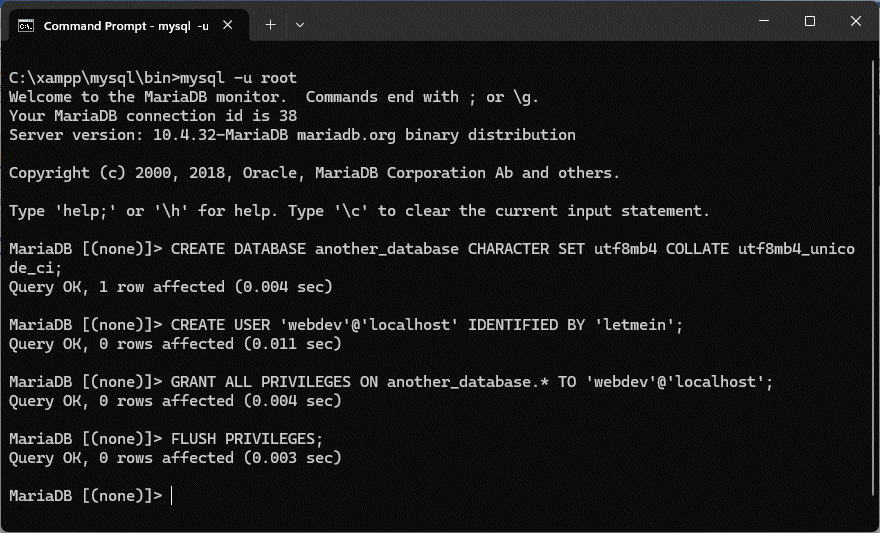
The MySQL command window should look like this
We have actually gone a step further using the command line method of creating a database in that we have created a user called webdev that has administrative rights for the database. Open phpMyAdmin once more and select another_database from the list on the left side of the browser window. Select the Privileges option from the drop-down menu at the top of the window. You should see something like the following:
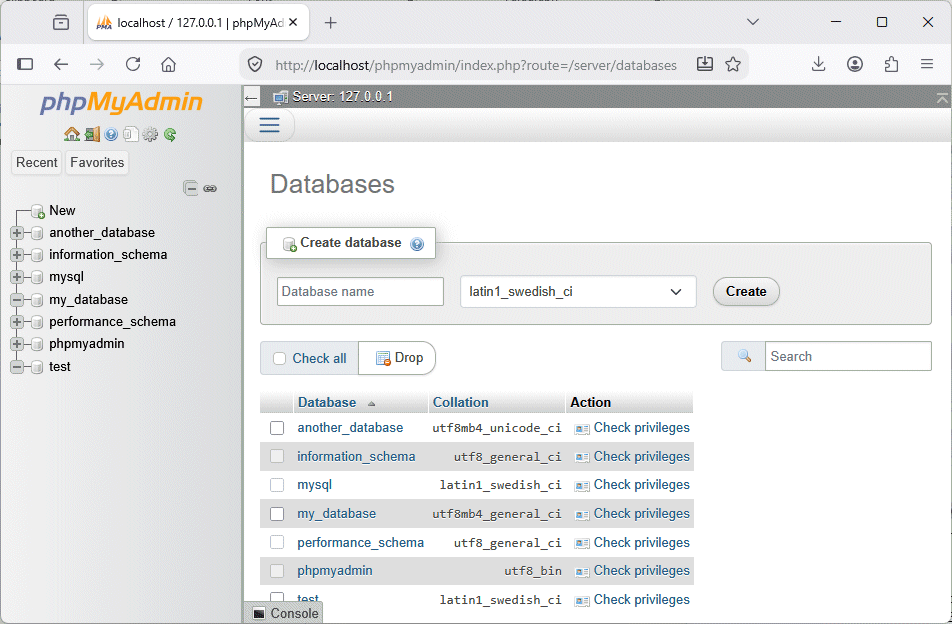
The webdev user has all privileges except GRANT
For the sake of consistency, we'll add the webdev user to my_database using the following commands in the MariaDB command window:
GRANT ALL PRIVILEGES ON my_database.* TO 'webdev'@'localhost';
FLUSH PRIVILEGES;
To exit the MySQL command shell, use the quit command.
If we now look at the privileges assigned for my_database in phpMyAdmin, we should see something like the following:
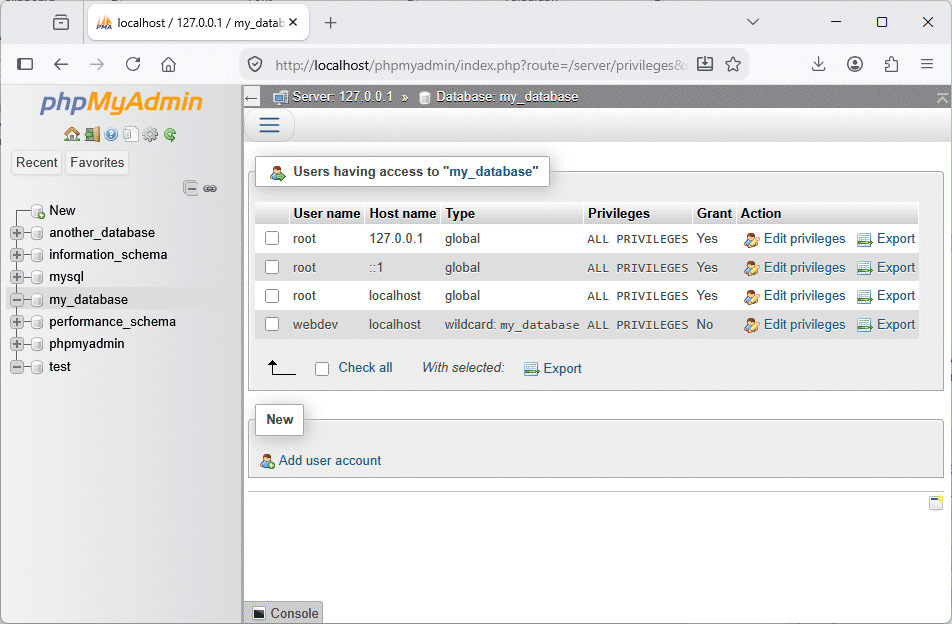
User webdev now has the same privileges for my_database
Obviously, we can create and make structural changes to a database using phpMyAdmin or the MySQL command window. Remember though that the ultimate goal, once we have created our database, is to be able to access the database in order to add, update or delete database records, as well as being able to retrieve information, using PHP.
None of the above is possible unless we can first establish a connection with the database. The connection acts as a conduit through which our application can communicate with the database. This can be achieved using MySQL Improved (MySQLi), a PHP extension that allows us to work with both MariaDB and MySQL databases.
The MySQLi application programming interface (API) allows us to use either object-oriented or procedural code to carry out various database operations, including the creation of the database connection itself. The connection is an object that is an instance of the msqli class. In order to create a connection using an object-oriented approach, we use the msqli() constructor, which takes up to six arguments:
$localhost - the name of the server
$username - the name of the user attempting to connect to the database
$password - the user's password
$database - the name of the database
$port - the port used for the connection
$socket - the socket path used for the connection
We don't usually need to specify either the port number or the socket path because PHP will automatically use the default MySQL port number (3306) and the system's default socket path when these parameters are not specified (or set to null). The following code attempts to establish a connection with the my_database database on the local server for the webdev user:
<?php
$server = "localhost";
$user = "webdev";
$pword = "letmein";
$db = "my_database";
// Create the connection using MySQLi (object oriented approach)
$conn = new mysqli($server, $user, $pword, $db);
// Check whether conection is successful
if ($conn->connect_error) {
die("Connection failed: " . $conn->connect_error);
exit();
}
else {
echo "Connection was successfull!";
// Close the connection
$conn->close();
}
?>
Once a connection has been established, we can use its built-in methods and properties to carry out database operations such as adding, updating or deleting database records, and retrieving information stored in the database. So far, we have not created any tables, so for the moment it's a case of "nothing to see here".
We can also establish a connection using a procedural approach. For example:
<?php
$server = "localhost";
$user = "webdev";
$pword = "letmein";
$db = "my_database";
// Create the connection using MySQLi (procedural approach)
$conn = mysqli_connect($server, $user, $pword, $db);
// Check whether the connection is successful
if (!$conn) {
die("Connection failed: " . mysqli_connect_error());
exit();
}
else {
echo "Connection was successful!";
// Close the connection
mysqli_close($conn);
}
?>
Note that the mysqli object returned by the procedural mysqli_connect() function is identical to the object returned by the mysqli() constructor. This means that in theory we can use both object-oriented and procedural PHP code in the same script when working with a MariaDB (or MySQL) database. For example, this code also works:
<?php
$server = "localhost";
$user = "webdev";
$pword = "letmein";
$db = "my_database";
// Create the connection using MySQLi (procedural approach)
$conn = mysqli_connect($server, $user, $pword, $db);
// Check whether connection is successful
if ($conn->connect_error) {
die("Connection failed: " . mysqli_connect_error());
exit();
}
else {
echo "Connection was successful!";
// Close the connection
$conn->close();
}
?>
Mixing up coding styles in this way is frowned upon and considered to be poor programming practice. Ideally, you should choose either a procedural approach or an object-oriented approach and stick to it. For the remainder of this article, we will be using an object-oriented approach to our database coding.
Whichever approach we use, the database connection will be closed automatically when our script terminates. However, it is considered good programming practice to close the database connection once we have finished working with the database, and this is reflected in the examples above.
There may be occasions when we want to delete a database altogether - maybe because we have simply been using it to test some code and no longer need it, or because the application it serves is no longer used or has been superseded. In that case we can remove the database - provided we have the necessary administrative privileges - either using phpMyAdmin or by using the MySQL DROP command.
Let's remove another_database using phpMyAdmin. The first thing we should do is to revoke the webdev user's privileges for this database:
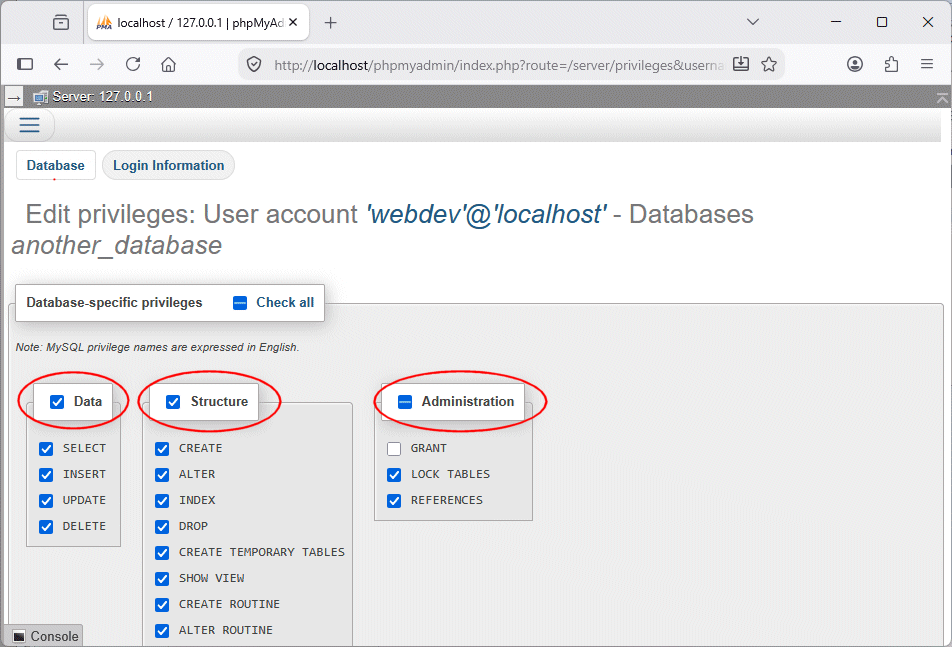
Uncheck the checkboxes next to Data, Structure and Administration
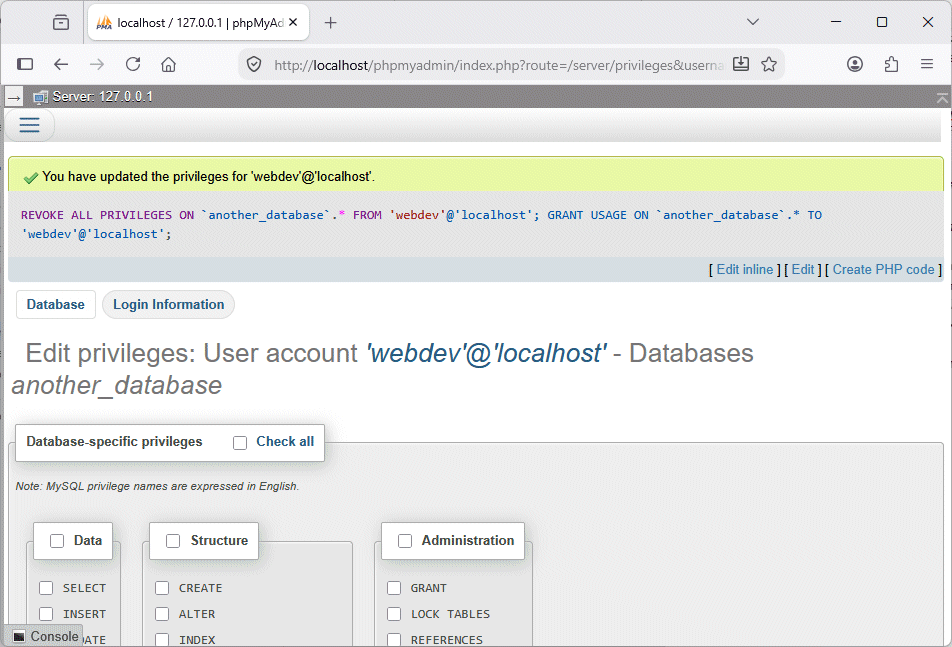
All database privileges have been removed from the webdev user
Now we can safely remove the database itself:
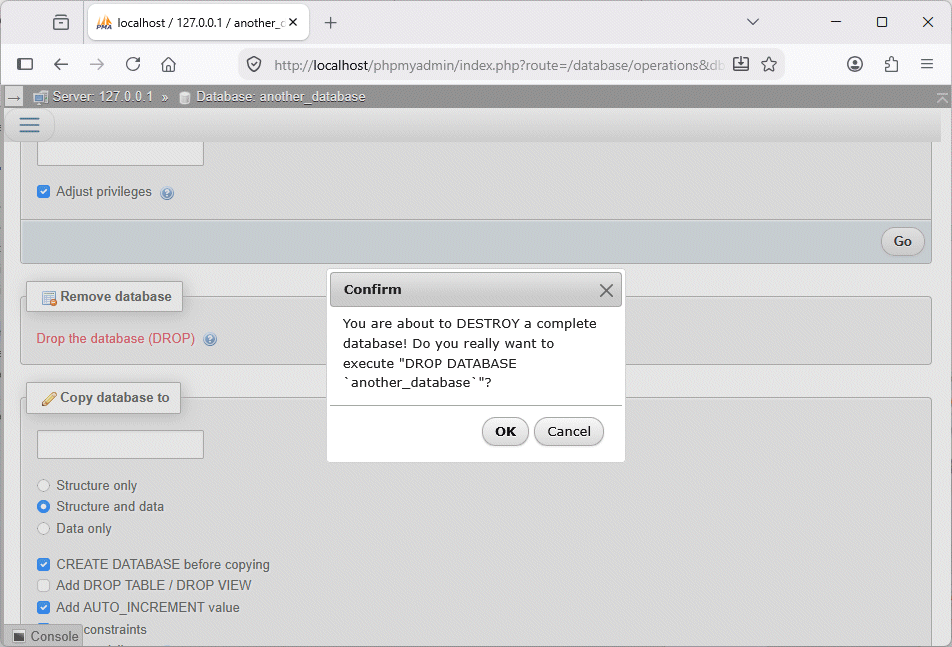
Click on the OK button to completely remove the database
The database will now be removed, and the main admin pane in phpMyAdmin will display a list of the remaining databases, including those maintained by MariaDB for its own internal purposes and my_database. Now we're going to drop my_database as well using the command line. First, we need to remove administrative rights for my_database from the webdev user:
mysql -u root
REVOKE ALL PRIVILEGES ON my_database.* FROM 'webdev'@'localhost';
We can now safely remove the database:
DROP DATABASE my_database;
All being well, your MySQL command window should now look like the illustration below.
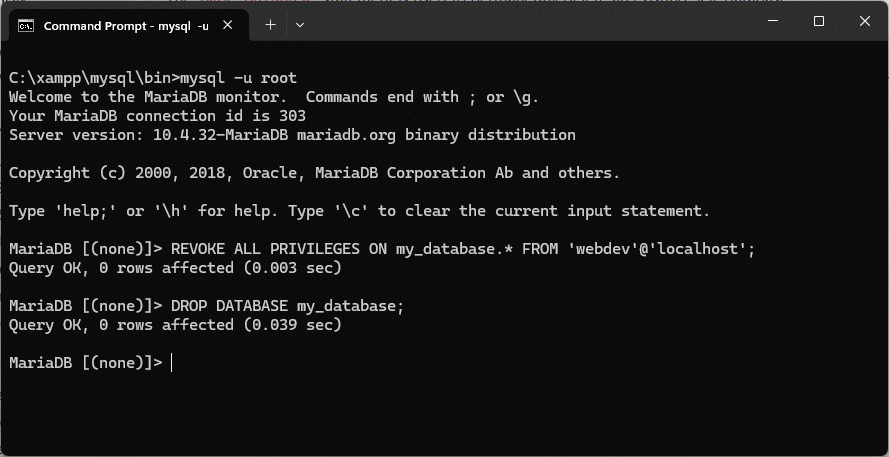
Your MySQL command window should now look like this
If you now return to the phpMyAdmin window in your browser and select the Databases tab (or select the Databases option from the drop down menu), you should see that my_database is no longer listed in the left-hand pane (you may need to refresh your browser to see the changes).
As previously stated, the information in a database is stored in flat (two-dimensional) tables consisting of rows and columns in which each row is a unique record and each column is a field that holds a specific type of value. Before we even start to create tables, however, a process of relational data analysis is undertaken to identify both the entities to be represented and the attributes that belong to each of those entities.
As an example, let's think about a simple sales database in which we want to store information about customer orders. We'll further suppose that the relational data analysis process has identified the entities involved as follows:
The aim of relational data analysis is to normalise the data, i.e. to break it down into a set of entities that are linked by one-to-many relationships in order to eliminate the possibility of redundant (i.e. duplicated) data being stored in the database and to facilitate the efficient retrieval of data. The diagram below shows the one-to-many relationships that have been identified by the relational data analysis process, together with the attributes identified for each entity.
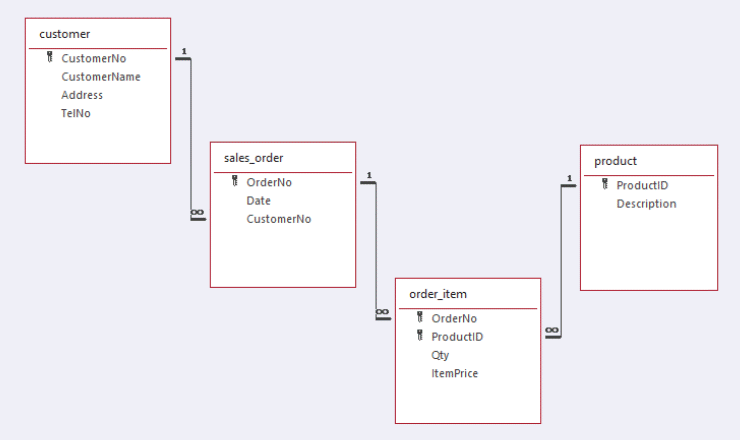
The database structure showing the one-to-many relationships between entities
We're now going to create a new database called acme_sales, and create a new user called sales_admin that has administrative rights to the new database. From this point forward, we'll increasingly be using the MySQL command line to create our database and its internal structure, but you can always check back with phpMyAdmin to see the effect of any changes we make. Open a MySQL command window as you have previously, and enter the following commands:
CREATE DATABASE acme_sales CHARACTER SET utf8mb4 COLLATE utf8mb4_unicode_ci;
CREATE USER 'sales_admin'@'localhost' IDENTIFIED BY 'letmein';
GRANT ALL PRIVILEGES ON acme_sales.* TO 'sales_admin'@'localhost';
FLUSH PRIVILEGES;
All being well, your MySQL command window should now look like the illustration below.
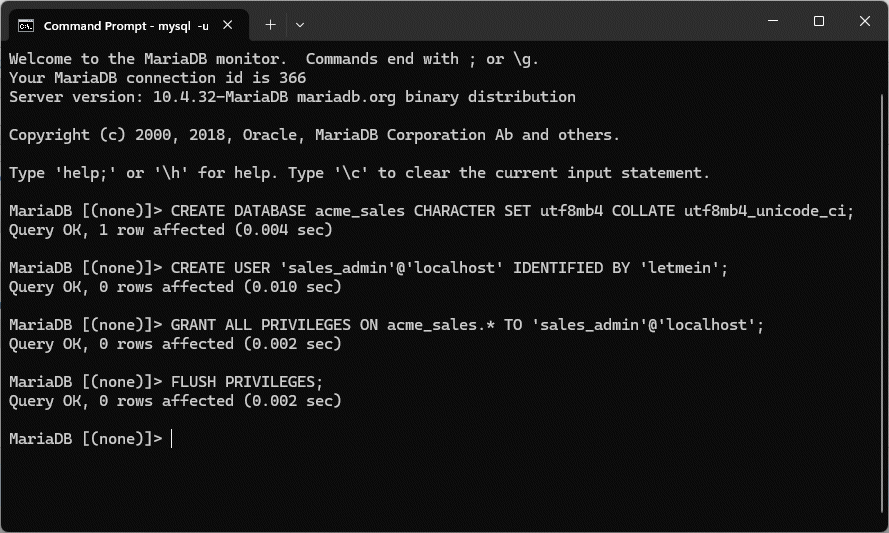
Your MySQL command window should now look like this
The first table we'll create is the customer table. As you can see from the database structure diagram above, the customer table has four fields – "CustomerNo", "CustomerName", "Address", and "TelNo". In real life, we would almost certainly require additional fields for the customer entity, such as "City", "PostCode", "Email", and so on, but for now we'll proceed with the fields we have identified and assign the attributes shown in the following table:
| Name | Type | Length/Values | Null | Default | Primary Key |
|---|---|---|---|---|---|
| CustomerNo | int | - | No | None | Yes (AI) |
| CustomerName | varchar | 30 | No | None | No |
| Address | varchar | 60 | No | None | No |
| TelNo | varchar | 20 | No | None | No |
For all of the fields except "CustomerNo", we have specified the name of the field (e.g. "CustomerName", its type (e.g. varchar), and its length (e.g. 30). All fields in the table should be set as non-null, and none of the fields will have default values.
Note that the "CustomerNo" field is a primary key, i.e. a key with a unique value (an integer value in this case) that identifies one, and only one, customer. The abbreviation "AI" stands for auto increment, which means that each time we create a new record in the customer table, the integer value assigned to the primary key will be one greater than the value assigned to primary key of the previous customer record, assuring that no duplicate primary keys are created.
We create a table in the MySQL command line environment using the create table command. The general syntax for the create table command is shown below.
create table <table_name> {
<column_name_1> <datatype>,
<column_name_2> <datatype>,
<column_name_3> <datatype>,
. . . . .
<column_name_n> <datatype>
);
The column_name argument specifies the name of the column (or field). The datatype argument specifies the type of information that can be stored in that column (we will look at the various data types allowed in MySQL in another article).
In the MySQL command window, run the following commands to create the customer table:
use acme_sales;
create table customer
(
CustomerNo int auto_increment primary key,
CustomerName varchar(30) not null,
Address text varchar(60) not null,
TelNo varchar(20) not null
);
The use command tells the MySQL server that we want to make changes to the acme_sales database. The create table command creates the customer table, and specifies the attributes that define it.
Note that, for the create table command, we have specified each attribute on a separate line for clarity. You should type the entire command on one line in the MySQL command window in order to avoid seeing a warning message, although the command should also work if entered as shown above. All being well, once you have run these commands your MySQL command window should look like the following illustration:
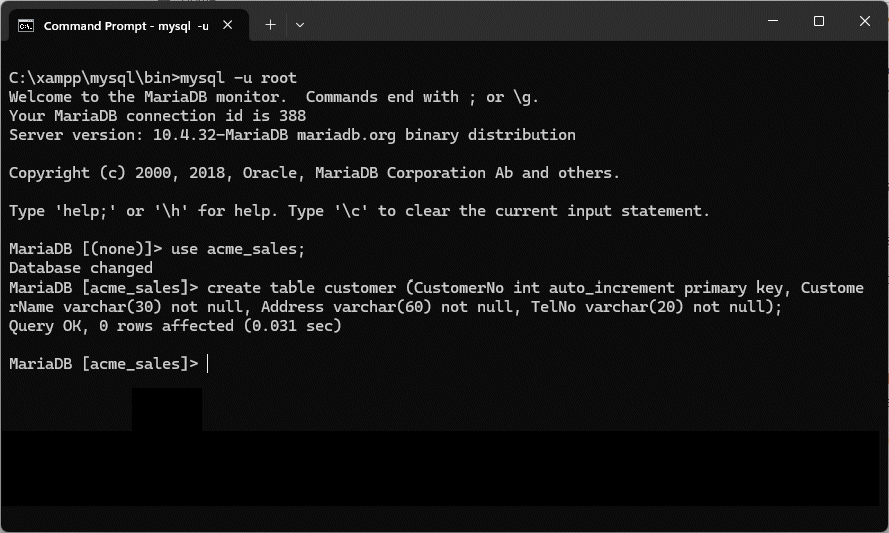
The MySQL command window should now look like this
We can now proceed to create the sales_order table in similar fashion. The table below lists the fields we need to create:
| Name | Type | Length/Values | Null | Default | Primary Key |
|---|---|---|---|---|---|
| OrderNo | int | - | No | None | Yes (AI) |
| Date | date | - | No | None | No |
| CustomerNo | int | - | No | None | No |
Here is the command we will use to create the sales_order table:
create table sales_order
(
OrderNo int auto_increment primary key,
Date date not null,
CustomerNo int not null
);
Here are the fields we need to create for the product table and the order_item table:
| Name | Type | Length/Values | Null | Default | Primary Key |
|---|---|---|---|---|---|
| ProductID | varchar | 12 | No | None | Yes (AI) |
| Description | text | - | No | None | No |
| Name | Type | Length/Values | Null | Default | Primary Key |
|---|---|---|---|---|---|
| OrderNo | int | - | No | None | Yes |
| ProductID | int | - | No | None | Yes |
| Qty | int | - | No | None | No |
| ItemPrice | decimal | 6,2 | No | None | No |
And here are the MySQL commands we need to run:
create table product
(
ProductID varchar(12),
Description text
);
create table order_item
(
OrderNo int,
ProductID int,
Qty int,
ItemPrice decimal (6,2)
);
As before, each of these commands should be entered on a single line. The form used above is simply used for the sake of readability. The product table has only two columns - "ProductID" and "Description" (we may need to add additional fields later). After each command is entered, and assuming the tables have been created successfully, you should see the message "Query OK, 0 rows affected (n.nn sec)". The time reported will vary, depending on the speed of your computer.
Note that we have not specified a length for any of the integer datatypes. The length will automatically default to 11 digits, which should be more than adequate for our purposes (and as we shall see, we can always adjust the length of a field at a later time).
We have already mentioned the role of the primary key as a unique value that identifies a specific record in a table, and we have already identified primary keys for two of our four tables. However, we have not yet created primary keys for either the sales_order table or the order_item table contain. Nevertheless, both of these tables contain foreign keys.
A foreign key is a field in a child table that is also a field in one of its parent tables. It is used to link the tables together in a one-to-many relationship in which the parent table sits at the "one" end of the relationship and the child table sits at the "many" end.
In the acme_sales database, a sales order can be linked to a specific customer using the "CustomerNo" attribute, which is both a primary key in the customer table and a foreign key in the sales_order table. In this relationship, the customer table is the parent and the sales_order table is the child.
Similar relationships will ultimately exist between the order_item table and both the sales_order and the product tables. Even though we have not so far actually specified any primary keys for either the order_item table or the product table, the database structure diagram we saw earlier clearly indicates that the order_item table is a child of both the sales_order table and the product table.
In fact, both the "OrderNo" key and the "PoductID" in the order_item table are foreign keys that will be used to link the three tables together. Primary keys, as we shall see, can consist of one or more foreign keys. A primary key that consists of more than one foreign key is called a compound primary key.
Constraints are used to enforce rules governing the kind of values a field can accept. They can either be specified when the table is created (using the create table command), or at some later time (using the alter table command). Two of the most commonly used constraints are described below.
For the last two tables we created (product and order_item), we did not specify any constraints, which is something we need to remedy. We'll start with the product table and make the necessary changes using phpMyAdmin:
You should be able to see the results of the changes you made in the phpMyAdmin window, as shown in the illustration below.
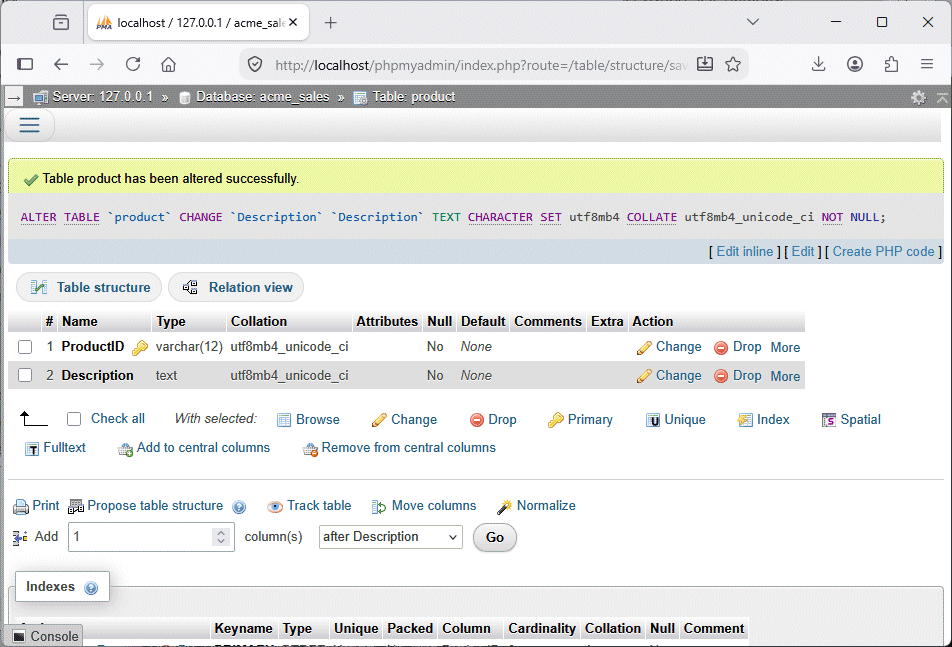
The changes to the product table can now be seen
We now need to make some changes to the order_item table, but this time we will use the MySQL command window. We need to change all of the fields to non-null fields, and set all of the default values to "None". We also need to create a compound primary key, i.e. a primary key that consists of more than one field, using the "OrderNo" and "ProductID" fields.
We'll deal with the compound key first. Login to the MySQL command line environment as the root user, and type the following commands:
use acme_sales;
alter table order_item add primary key(OrderNo, ProductID);
This command will not only create the compound primary key from the "OrderNo" and "ProductID" fields, but will also set the default values for both of these fields to "None" and impose the not null constraint on them. We'll now deal with the "Qty" and "ItemPrice" fields using the following commands:
alter table order_item modify Qty int not null;
alter table order_item modify ItemPrice decimal(6,2) not null;
These commands will not only impose the not null constraint on the "Qty" and "ItemPrice" fields; they will also set their default values to "None". If you now go back into the phpMyAdmin window and look at the structure of the order_item table, you should see something like the illustration below:
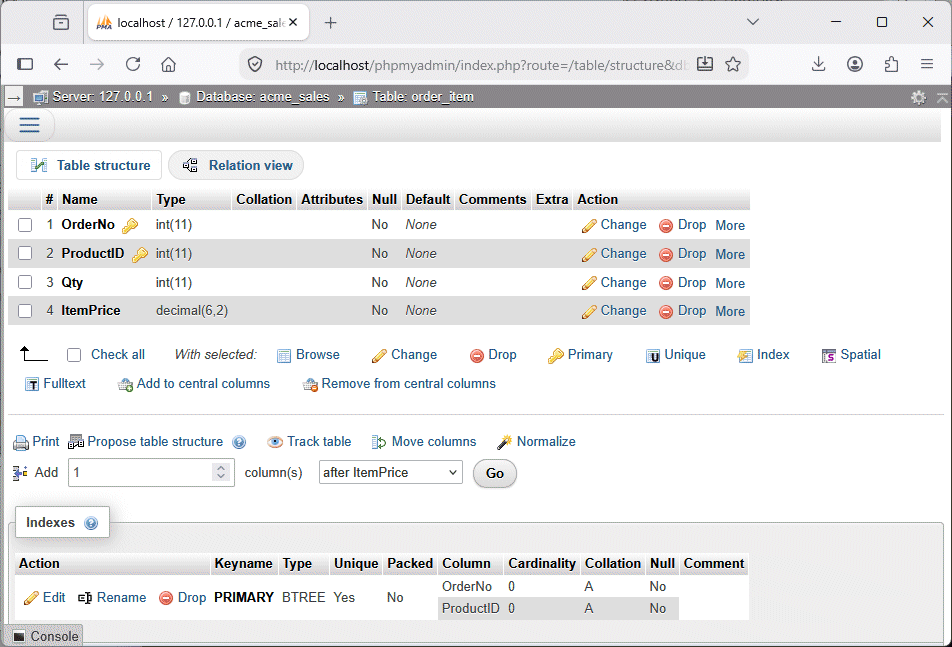
The order_item table now has additional constraints, including a compound primary key
We can see a list of the tables in our database by opening a MySQL command interface and using the following commands:
use acme_sales;
show tables;
We should now see something like the illustration below in the MySQL console window.
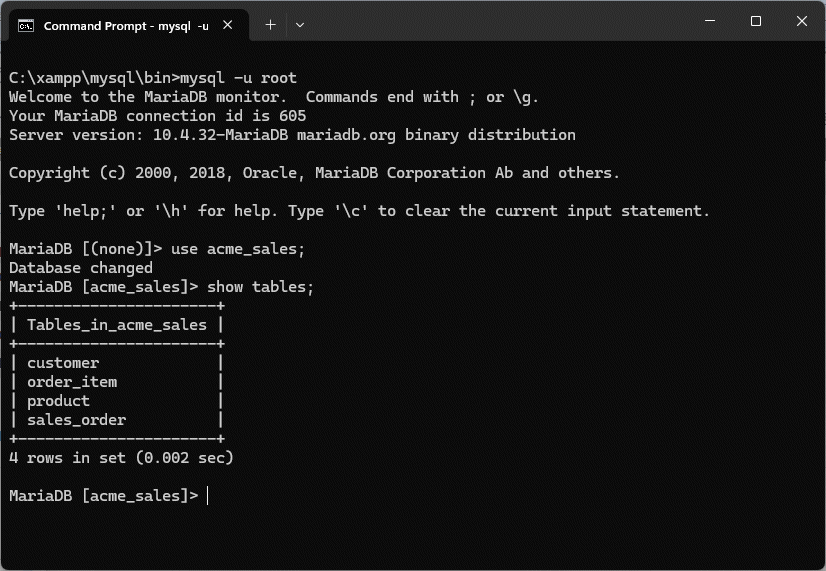
The show tables command lists the tables for the acme_sales database
We can also display the structure of an individual table. We'll do this for the order_item table using the following command:
desc order_item;
Our Mysql console window should now look something like this:
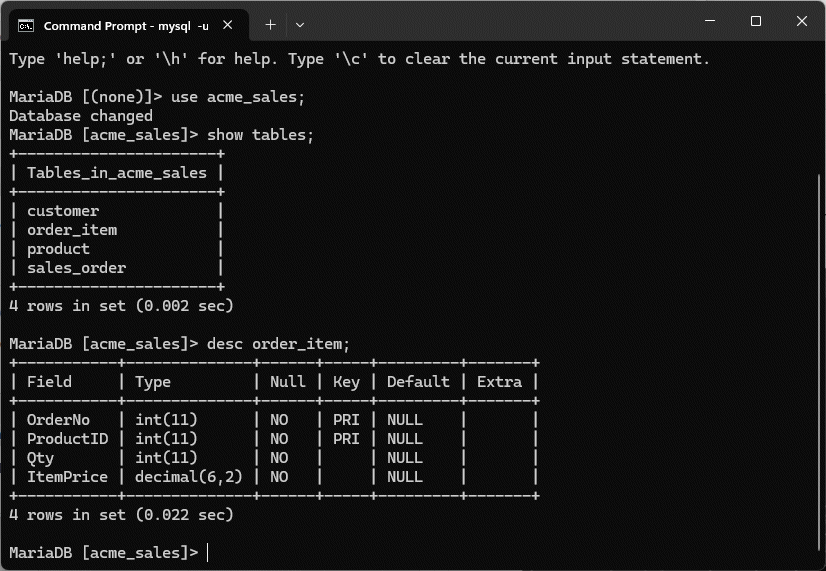
The desc command shows the fields and their datatypes
The purpose of a database is to store the data required by an application in order for it to carry out various tasks. In the case of our acme_sales database, we need to store data about products, customers, and the orders received from those customers. Creating the database is only the first step.
Once we have created a database, we need to write the application code that will carry out the various transactions involved in working with the database. A database transaction is an operation, or a series of operations, that will be undertaken in order to read, write, or update data.
A transaction will either succeed or fail. Either way, the transaction should leave the database in a valid state without introducing errors or inconsistencies. To that end, a database is expected to follow a set of guidelines defined by the acronym ACID, which stands for Atomicity, Consistency, Isolation and Durability.
The overall aim of applying the ACID principles is to safeguard both the data integrity and consistency of a database management system by ensuring that transactions either complete successfully or not at all, preventing a database from being caught between two valid states. This prevents a situation in which an update that is only partially successful would result in data being corrupted. Compliance with the ACID principles is a standard feature of just about every major RDBMS, including MariaDB and MySQL.