
| Author: | |
| Website: | |
| Page title: | |
| URL: | |
| Published: | |
| Last revised: | |
| Accessed: |

Many web applications require users to be able to upload files to a server. Examples include social media platforms such as Facebook or YouTube, cloud storage systems such as Google Drive and OneDrive, content management systems such as WordPress or Joomla, and online-shopping sites such as Amazon or eBay. The kind of files we might want to upload can be broadly split into the following categories:
The destination of the uploaded file is usually a folder located somewhere on our server, although it could also be a third-party cloud facility or file management service hosted by an external company or organisation such as Amazon S3 (Simple Storage Service) or Google Cloud Storage. Such services typically offer scalable and secure file hosting, with the cost depending on the type of customer (e.g. individual, small business or enterprise) and the volume of storage required.
For the purposes of this article, we will be mainly concentrating on uploading files of various kinds to our own server, using standard PHP code and (on the client-side) HTML and JavaScript code. We'll also be using CSS to make everything look pretty!
There are of course a number of third-party modules and code libraries available that can be used to facilitate the task of uploading files to a server, many of which provide robust and secure file upload facilities, and you are welcome to explore them as and when you see fit. However, a good grasp of how to code your own file upload solutions will, at the very least, provide you with a degree of insight into how the process works.
Uploading a file (or multiple files) to a server typically involves two main components - an HTML form on the client end that allows a user to select a file (or files) for upload, and a PHP script that handles the uploaded file (or files) on the server end. The HTML form will upload a file to a temporary directory on the server. The PHP script will attempt to relocate the file to a designated target location, and will inform the client of the success or failure of the upload process.
There are a number of security issues to be considered when uploading files to the server, and we need to take measures to ensure that any code we write to handle file uploads cannot be hijacked by a hacker in order to gain unauthorised access to the server, or to upload files that contain malicious code. To that end we can impose restrictions on file uploads. For example, we might specify a maximum file size, or create a "whitelist" of acceptable file extensions.
There are two ways in which we can enforce file upload restrictions. We can make modifications to the php.ini file. We can also code them into individual PHP scripts. The main difference is that the restrictions specified in a PHP script will only be applied to uploads handled by that script, whereas the restrictions specified in the php.ini file will affect all of the PHP applications on our server.
The parameters governing the restrictions on file uploads, such as the maximum file size, the maximum number of files uploaded in a single operation, or the maximum time allowed for a single file upload, can all be set by changing specific settings in the php.ini file or possibly (if you are using a web hosting service) via the service provider's control panel. The specific settings we are most likely to be interested in in this context are:
You will find the php.ini file in the directory \xampp\php\. The values currently specified for these settings on our server are as follows:
file_uploads = On
;;
upload_tmp_dir = "\xampp\tmp"
;;
upload_max_filesize = 40M
;;
max_file_uploads = 20
;;
post_max_size = 40M
The values on your server may differ from those shown. We suggest you leave them as they are for the moment, although you may need to modify them as we progress through the examples in this article.
Some online forms allow a user to upload one or more files to a server. Such forms are used to facilitate the collection of data typically required for processes such as user registrations or online job applications.
If you have read the article "Form Processing with PHP" in this section, you may recall that we created a user registration form that required the user to enter a username, email address and password as text data, and enabled them to select and upload an image file to be used as their online avatar.
In order to illustrate some basic principles, we're going to start by creating a somewhat simpler web page containing an upload form that uploads a file of any type. Here is the code:
<!doctype html>
<html lang="en">
<head>
<meta charset="utf-8">
<title>Upload Demo</title>
<style>
h1 { text-align: center; }
form {width: fit-content; margin: auto; border: solid black 1px; padding: 0 1em;}
label {width: 100px; display: inline-block; text-align: right;}
</style>
</head>
<body>
<h1>Upload a File</h1>
<form id="frm" method="POST" action="" enctype="multipart/form-data">
<p>
<label for="upload_file">Select a file: </label>
<input type="file" name="upload_file" id="upload_file" accept="*/*" />
</p>
<p>
<label></label>
<input type="submit" value="Upload">
</p>
</form>
</body>
</html>
Examine the code above. It's important to note that if we want to upload a file, as opposed to simply submitting text-based form data, we need to set the method attribute to "POST" and the enctype attribute to "multipart/form-data". The enctype attribute tells the browser which content-type to use when submitting the form. In this case we specify it as multipart form data to inform the browser that, as well as any text data entered in the form's fields by the user, we are also sending binary data, i.e. a file of some description.
The <input type="file"> tag is an input field that enables us to select a single file from local storage for upload to the server. We have given this input field a name ("upload_file"), which will enable the script specified by the form's action attribute to identify the uploaded file. Because we have specified the input type as "file", a Browse button is displayed automatically by the browser to enable the user to select a file.
Note that we have set the form's accept attribute to "*/*". The two asterisks are wildcards representing the filename and the file extension respectively, which essentially means we can upload any file we want!
Now take the following steps to set things up:
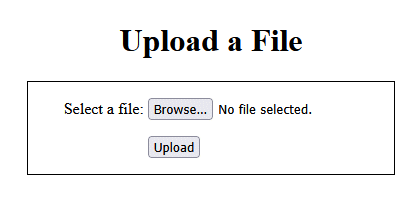
Open upload.html in a web browser
Click on the Browse button in order to select a file (note that clicking on the Upload button will not do anything useful at the moment, because we haven't yet created an upload script). I have selected the file Lorem Ipsum.txt, which is located in the sub-directory D:\Public\My Stuff on my computer, as shown in the illustration below. Obviously, what you see when you select a file will be different, depending on the name and location of the file you select.
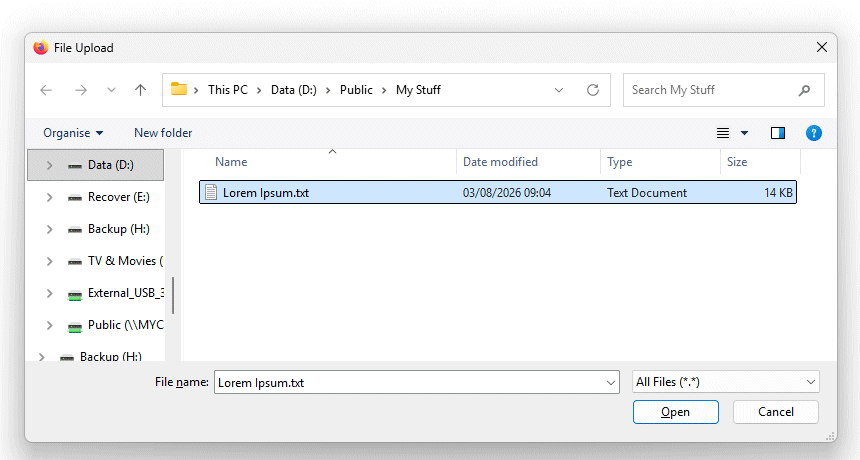
Select a file to upload
You can use the Browse button to select files of various types, anywhere on your computer. In fact, there are no restrictions whatsoever on the type of file you can select, or on the size of the file. You can even select executable files! This is not good for obvious reasons, but we'll see how to impose suitable restrictions in due course.
First, let's think about what happens to the form data if no action attribute is provided. The form data (in this case it's just the file we selected) will be submitted, but it will be submitted to the form itself because there is no script or program specified in the form's action attribute.
The uploaded file will be stored momentarily in a temporary directory - usually the directory specified by the upload_tmp_dir directive specified in the php.ini file - with a temporary filename generated by the server.
In the normal course of events, the form data is sent to the script specified by the form's action directive, which will contain the code required to handle the uploaded file. This code typically specifies the file's destination, i.e. the directory on the server in which it will be stored, and the filename that will be assigned to the file (this could be the original filename, or it could be something completely different).
Once the script has finished processing the form data, regardless of whether or not it has actually done anything with the uploaded file, the file is automatically deleted from the temporary directory. If the form's action attribute has been left empty, the uploaded file will be deleted from the temporary directory immediately and will not be stored on the server.
We have created a very simple PHP script that will handle the file uploaded by our upload form. It doesn't implement any checks and balances (we'll get to that in due course). The script will simply attempt to store the uploaded file in the /uploads/ subdirectory using the original filename.
If the file's size does not exceed the maximum file size specified by the upload_max_filesize directive in the php.ini file (ours is currently set to 40 MB), the operation should be successful. If not, you will see one or more warning messages. Here is the code:
<?php
$upload_dir = "uploads/";
$filename = basename($_FILES["upload_file"]["name"]);
if(!$filename == "") {
$upload_file = $upload_dir . $filename;
print_r("Temporary filename: " . $_FILES["upload_file"]["tmp_name"]);
move_uploaded_file($_FILES["upload_file"]["tmp_name"], $upload_file);
}
?>
Copy and paste the code above into a new text file and save it as upload.php in your server's document root directory. Once you have doe that, change the upload form's action attribute in upload.html to read action="upload.php", and open the page once more in your browser using the same URL as before.
Use the Browse button to select a file, and then click on the Upload button. If the file has been successfully uploaded, you should now see a message in your browser window similar to the following:
"Temporary filename: D:\xampp\tmp\phpB1FC.tmp"
The name of the temporary filename is randomly generated, and will be different for every upload operation. The reason we programmed our script to print it to the screen is to prove that it really was created. Be advised, however, that any attempt to find the file in your server's temporary directory will result in failure, because our script has already renamed it and moved it to the /uploads/ directory. You should however be able to see your file in the /uploads/ directory with its original filename.
You might have noted that we make use of the $_FILES superglobal in our script, and we'll be looking at the significance of this next. Before we move on, however, there are a couple of other things we should mention about our script.
First, the variables $upload_dir, $filename and $upload_file hold the pathname of the uploads directory we created on the server, the name of the file we have selected for upload, and the intended pathname for the uploaded file. If no file has been selected, the $filename variable will be an empty string, and no further action is taken.
Second, the move_uploaded_file() function is a built-in PHP function that takes two parameters. The first parameter is the temporary filename of the uploaded file. The second is the intended pathname of the uploaded file. If the function is successful, it moves the upload file from the temporary directory to its final destination, renames it, and returns true.
If the name of the upload file is missing or otherwise invalid, it returns false. If the name of the upload file is valid, but the file cannot be uploaded for some reason, such as exceeding the maximum upload size, the function returns false, and a warning will be displayed.
The $_FILES variable is a PHP superglobal that is automatically generated when a file is uploaded to a PHP script. For a single file upload, it consists of a two-dimensional associative array that holds information about the file such as its mime type and size. We have already seen how it is used by our basic PHP upload script.
Below, we provide a complete listing of the key-value pairs in the $_FILES array, with a brief explanation of how each might be used in our scripts. Note that in the two-dimensional array used to store information about a single uploaded file, the key is constant throughout, and will be the name of the input field used to upload the file (represented by "user file" in our list).
The error codes supplied to the $_FILES["upload_file"]["error"] array element are can be any one of eight values defined by the following integer constants:
| Int | Constant | Meaning |
|---|---|---|
| 0 | UPLOAD_ERR_OK | The file was uploaded successfully. |
| 1 | UPLOAD_ERR_INI_SIZE | The uploaded file exceeds the upload_max_filesize directive in php.ini. |
| 2 | UPLOAD_ERR_FORM_SIZE | The uploaded file exceeds the MAX_FILE_SIZE directive specified in the HTML form. |
| 3 | UPLOAD_ERR_PARTIAL | The uploaded file was only partially uploaded. |
| 4 | UPLOAD_ERR_NO_FILE | No file was uploaded. |
| 6 | UPLOAD_ERR_NO_TMP_DIR | Missing a temporary folder. |
| 7 | UPLOAD_ERR_CANT_WRITE | Failed to write file to disk. |
| 8 | UPLOAD_ERR_EXTENSION | A PHP extension stopped the file upload. |
Let's now change our PHP upload script to demonstrate how the information stored in the $_FILES superglobal can be accessed. Here is the revised code:
<?php
$upload_dir = "uploads/";
$filename = basename($_FILES["upload_file"]["name"]);
if(!$filename == "") {
echo "File uploaded successfully!<br><br>";
$upload_file = $upload_dir . $filename;
move_uploaded_file($_FILES["upload_file"]["tmp_name"], $upload_file);
}
else {
echo "No file was uploaded.<br><br>";
}
print_r("Original filename:" . $_FILES["upload_file"]["name"] . "<br><br>");
print_r("File (mime) type:" . $_FILES["upload_file"]["type"] . "<br><br>");
print_r("File size (bytes):" . $_FILES["upload_file"]["size"] . "<br><br>");
print_r("Temporary filename:" . $_FILES["upload_file"]["tmp_name"] . "<br><br>");
print_r("Error code:" . $_FILES["upload_file"]["error"] . "<br><br>");
print_r("Full path:" . $_FILES["upload_file"]["full_path"]);
?>
Save the file once more, open the upload.html page in your browser again using the same URL as before, select a file (making sure that it does not exceed the maximum upload file size imposed by your server), and click on the Upload button. Depending on the file you selected, you should see something like the following illustration in your browser window:
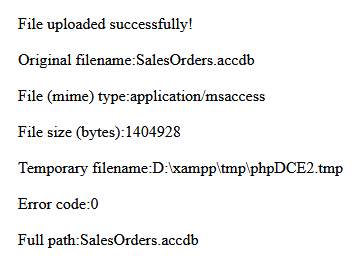
The $_FILES superglobal holds information about the uploaded file
Note that there is currently no contingency in the upload.html file to check whether or not a file has actually been selected. If you click on the Upload button without first selection a file, the (non-existent) form data is still submitted to the PHP upload script. The result will be that most of the values displayed for the $_FILES superglobal will be blank except for the file size (0 bytes) and the error code (4), as shown below.
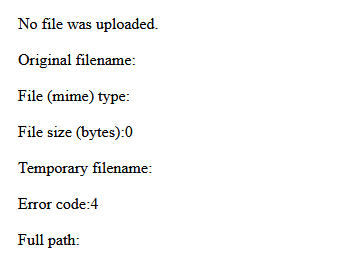
The $_FILES superglobal values displayed if no file is uploaded
The first line of defence when it comes to restricting the type and size of the file to be uploaded is the HTML upload form. We can make some simple changes to our upload form to make it somewhat more discriminating in terms of the files it will accept. The first thing we need to decide is what type of files do we want to upload.
Let's assume for the moment that we want to create a file upload form so that we can select images of various kinds and store them on our server in their original format. They could be scanned images, images that we have created using a graphics software package, photographs we have taken with a digital camera, or images we have downloaded from various online sources.
The general idea is that we might want to use these images at some later time for inclusion in (for example) a printed publication or a web page. If so, we might need to perform various editing activities such as resizing or cropping, but for now we are just collecting images.
The images we are interested in could include photographs, drawings, charts, diagrams, icons, or various forms of digital art. We want to be able to browse image files of various types and upload them to a dedicated folder on the server, but it would be nice if we could limit the kind of files we see when we hit the Browse button to only graphic image files(as opposed to any other kind of file).
We can do this using a list of image file extensions that will act as a filter. The question then becomes one of which file extensions to use, because there are a huge number of image file formats to choose from. For online publications, the most popular image file formats by far are JPEG, GIF and PNG files, so for now, we're going to restrict our browsing to those filetypes.
The abbreviations above represent the following file formats and mime types:
Here is the code for an HTML upload page that allows us to select any file with one of these mime types:
<!doctype html>
<html lang="en">
<head>
<meta charset="utf-8">
<title>Image Upload Demo</title>
<style>
h1, p.msg { text-align: center; }
form {width: 800px; margin: auto; border: solid 1px; padding: 0 1em;}
label {width: 140px; display: inline-block; text-align: right; vertical-align: top; }
img { border: solid #ccc 1px; margin: 5px; }
</style>
</head>
<body onload="resetFile()">
<h1>Upload an Image</h1>
<form id="frm" method="POST" action="" enctype="multipart/form-data">
<p>
<label for="upload_image">Select an image file: </label>
<input type="file" name="upload_image" id="upload_image" accept="image/png, image/jpeg, image/gif" />
</p>
<p>
<label for="preview">Peview: </label>
<img name="preview" id="preview" height="300" width="auto" src="images/placeholder.gif">
</p>
<p>
<label></label>
<input type="submit" value="Submit">
</p>
<p>
<label></label>
<button type="button" onclick="resetFile()">
Clear selected file
</button>
</p>
</form>
<script>
const frm = document.getElementById("frm");
const upload_image = frm.upload_image;
const preview = frm.preview;
const reader = new FileReader();
upload_image.addEventListener("change", getPic);
reader.addEventListener("load", loadPic);
function getPic() { reader.readAsDataURL(upload_image.files[0]); }
function loadPic() { preview.src = reader.result; }
function resetFile() {
const file = document.getElementById("upload_image");
const img = document.getElementById("preview");
file.value = "";
img.src = "images/placeholder.gif";
}
</script>
</body>
</html>
Most of this code should be fairly self explanatory if you have read the article "Form Processing with PHP" in this section, in which we provided an example similar to one above in the sense that it allows a user to upload an image to be used as their online avatar. If you need a more in-depth explanation of how the code works, you might want to read (or re-read) that article.
In a nutshell, the upload form allows us to select a file to upload as per the previous example, but this time the choice is limited to only certain types of graphic image. Because we are dealing with images, we have included a preview window so the user can see the image they have selected before they upload it. The main purpose of the JavaScript code used in this example is to facilitate this functionality.
We restrict the type of file the user will see when they hit the Browse button and start searching for files to upload by telling the browser what files our form is allowed to upload using the file input field's accept attribute:
<input type="file" name="upload_image" id="upload_image" accept="image/png, image/jpeg, image/gif" />
As you can see, the value assigned to the accept attribute is a comma-separated list of mime types that identify the image file formats we are interested in. No other file types can be selected by the user.
In order to see the form in action, complete the following steps:
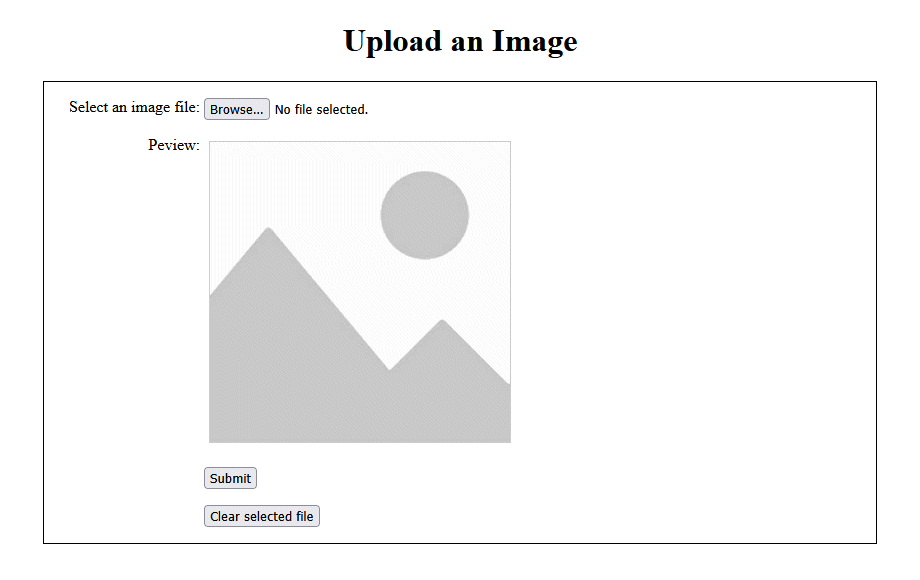
Open image_upload.html in a web browser
Click on the Browse button in order to select a file (note that clicking on the Submit button will not do anything useful at the moment, because we haven't yet created an upload script). I have selected the file Sunrise.JPG, which is located in the default Pictures directory on my computer. You should see something like the illustration below (obviously, what you see when you select a file will be different, depending on the image file you select).
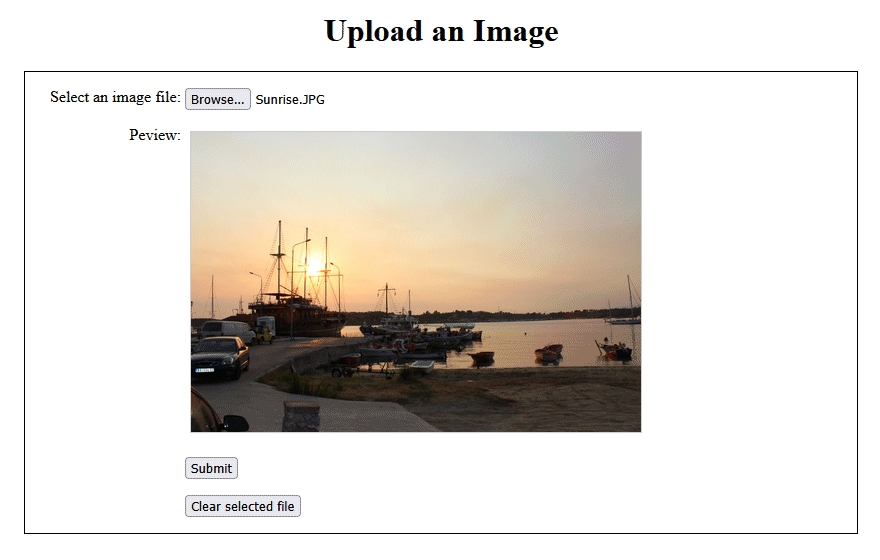
The Sunrise.JPG file has been selected
The next question is, what should we set as the maximum file size we for our uploaded images? For high-quality professional printing purposes, photographic files can have a file size of anywhere from 10 to 20 megabytes - sometimes even higher. That's probably way more than we actually need for our purposes, so we'll set a ceiling of 10 megabytes.
We can specify a maximum file upload size by placing the necessary code in our HTML upload form, as we shall see, although the value we set must not exceed any size restrictions set by the server. The maximum values for upload_max_filesize and post_max_size in our php.ini file are both currently set to 40 megabytes, so we don't need to make any changes there (if your php.ini file has values of less than 10 megabytes for either of these directives, adjust them accordingly).
We can tell our HTML form not to upload image files with a file size greater than 10 megabytes by including a hidden <input/> field in the form with the name MAX_FILE_SIZE and the value set to 10,485,760 bytes (10 MB). Here is the code we need to insert in our form:
<input type="hidden" name="MAX_FILE_SIZE" value="10485760"/>
Add the above code to your HTML image upload form (image_upload.html) and save it once more (note that this field must come before any <input type="file"/> field in order to have any effect).
Note that the presence of the MAX_FILE_SIZE field does not prevent you from selecting a file that is larger that the permitted maximum file size, but the file will not be uploaded. The $_FILES superglobal generated by PHP will contain the name of the file, but the file size will be reported as 0 bytes, and the error code will be set to 2 to indicate that the file exceeds the MAX_FILE_SIZE directive specified in the HTML form.
Using the MAX_FILE_SIZE field is recommended because it prevents excessively large files from being uploaded only for the upload to fail and causing the server to generate an error message at the end of the process. Unless we do something to prevent it on the client end, the PHP upload script will still be executed when we click on the Upload button, so the script should include code to inform the user when the file size causes a problem.
We're going to create a new PHP file upload script that handles the files submitted by our image upload form. We should point out up front that the script will perform its own checks on the uploaded file in order to ensure that it does indeed have one of the permitted mime types, and does not exceed the maximum permitted file size. The reason for this apparent duplication of effort is that the file restriction implemented by client-side forms can be circumvented relatively easily by a hacker.
We might also want to implement some additional checks and balances that simply cannot be undertaken using client-side code. For example, if the image we are trying to upload has the same filename as a file that already exists in the /image_uploads/ directory on the server, our script should include the necessary logic to prevent the existing file from being overwritten, perhaps by ensuring that each file has a unique filename on the server.
Once completed, our new upload script will be used by the image_upload.html web page we created earlier to do something with the images we upload using that page. We'll present the code for our upload script first and then look at how the script implements the various restrictions we wish to impose. Here is the script:
<?php
$upload_dir = "image_uploads/";
$max_size = 10485760;
$types = array("image/jpeg", "image/gif", "image/png");
$filename = basename($_FILES["upload_image"]["name"]);
$upload_image = $upload_dir . $filename;
$tempname = $_FILES["upload_image"]["tmp_name"];
$filesize = filesize($_FILES["upload_image"]["tmp_name"]);
$mimetype = mime_content_type($_FILES["upload_image"]["tmp_name"]);
echo "File name: " . $filename . "<br>";
echo "Destination: " . $upload_image . "<br>";
echo "Temp name: " . $tempname . "<br>";
echo "File size: " . $filesize . "<br>";
echo "Mime type: " . $mimetype . "<br><br>";
if(file_exists($upload_image)) {
echo "A file with this name already exists in the upload folder.<br><br>";
}
else if($filesize > $max_size) {
echo "The file exceeds the maximum permitted size.<br><br>";
}
else if($filesize == 0) {
echo "No file was uploaded.<br><br>";
}
else if (!in_array($mimetype, $types)) {
echo "The filetype is not supported.<br><br>";
}
else {
if(move_uploaded_file($_FILES["upload_image"]["tmp_name"], $upload_image)) {
echo "File uploaded successfully!<br><br>";
}
}
?>
<form method="POST" action="image_upload.html">
<p>
<input type="submit" value="Return to upload page" />
</p>
</form>
In order to see the script in action, complete the following steps:
<!-- <input type="hidden" name="MAX_FILE_SIZE" value="10485760"/> -->
<!-- <input type="file" name="upload_image" id="upload_image" accept="image/png, image/jpeg, image/gif" /> -->
<input type="file" name="upload_image" id="upload_image" />
You should now see a list of file attributes in your browser window that includes the name of the file as it appears on your local storage device, the temporary name assigned to the uploaded file on the server, the size of the file in bytes, and the file's mime type. Depending on the type and size of the file you select you will also see a message informing you of the success or failure of the upload operation.
Assuming you have selected a file that does not exceed the maximum size permitted and that has one of the permitted mime types, you should see something like the illustration below.
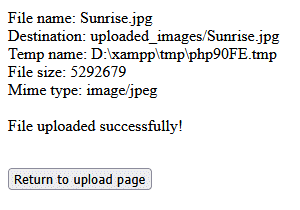
The file has been uploaded successfully
The revised PHP script implements the same functionality as its predecessor, but we have added some code that checks the relevant file attributes to ensure that only files of the correct type, and that do not exceed the maximum permitted file size, will be uploaded to the server. We have also added code to check whether the file (or at least, a file with the same name) already exists on the server.
We have deliberately disabled (temporarily) the restrictions on file size and mime type in the image_upload.html file so that we can see how the restrictions built into the PHP script handle any violation of these restrictions. Note that we do not make use of the $_FILES superglobal to determine either file size or mime type because, as previously mentioned, it is too easy for a hacker to manipulate the properties of the $_FILES variable in order to upload files that contain malicious code.
Let's take a look at whet the code actually does. The fist thing to note is that we have defined several variables that will be used by our script to determine whether or not the submitted file meets our requirements, and to handle the upload process itself:
$filename = basename($_FILES["upload_image"]["name"]);
$upload_image = $upload_dir . $filename;
$tempname = $_FILES["upload_image"]["tmp_name"];
$filesize = filesize($_FILES["upload_image"]["tmp_name"]);
$mimetype = mime_content_type($_FILES["upload_image"]["tmp_name"]);
These variables will hold the following information:
$filename - the name of the uploaded file as it appears in local storage on the client
$upload_image - the path to the intended destination file on the server
$tempname - the temporary filename assigned to the uploaded file
$filesize - the actual size of the uploaded file in bytes
$mimetype - the actual mime type of the uploaded file
Note the emphasis on the word actual in the descriptions of the last two variables ($filesize and $mimetype). This is because we have used PHP's built-in filesize() function to determine the true size of the uploaded file rather than relying on $_FILES["upload_image"]["size"]. Similarly, we have used PHP's mime_content_type() function to determine the true mime type of the uploaded file rather than relying on $_FILES["upload_image"]["type"].
Before it does anything else, however, the script will check to see whether a file with the same name as the file we have chosen to upload already exists in the /image_upload/ directory on the server, in which case it will generate a message to let the user know that this is the case, the uploaded file will be discarded, and the existing file will not be overwritten. Here is the code that checks whether a file with the same name already exists in the upload directory:
if(file_exists($upload_image)) {
echo "A file with this name already exists in the upload folder.<br><br>";
}
Let's say we have already successfully uploaded the Sunrise.jpg file to the server, and (for whatever reason) we attempt to upload it a second time. The result is that we should see something like this:
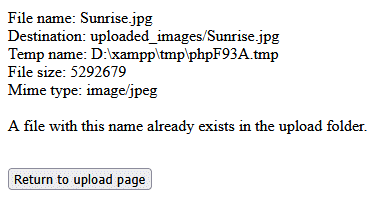
The file already exists in the upload folder
Note that we have not yet written any code to offer the user an alternative course of action, such as overwriting the existing file or saving the current upload with a different filename. We'll look at some possibilities for doing so a little later in this article.
Assuming the uploaded file does not already exist in the upload folder, the next thing our script does is to check the size of the file. If this is greater than the maximum permitted file size, the user will be informed and the file will be discarded. Here is the code that carries out the check:
else if($filesize > $max_size) {
echo "The file exceeds the maximum permitted size.<br><br>";
}
In order to test this code, we have purposely created a very large .gif file by taking a screen shot from the fantasy role-playing game Ultima, created by Richard Garriott in 1981, and increasing its size to 10.3 MB (10,829,761 bytes to be precise), which exceeds the maximum file size defined by our script's $max_size variable (10 MB, or 10485760 bytes). Attempting to upload this file results in the following output in our browser window:
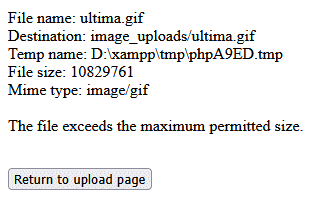
The file exceeds the maximum permitted size
The last thing our script must do before it accepts an uploaded file is to establish the file's mime type to determine whether or not it is one of the file types we can accept. As previously stated, we have removed the file type restriction in the image_upload.html file, but even if we had not done so, a hacker could simply change the file extension of any file to match one of the accepted mime types (image/png, image/jpeg, or image/gif). Here is the code that checks the mime type:
else if (!in_array($mimetype, $types)) {
echo "The filetype is not supported.<br><br>";
}
We can test this part of our script by deliberately changing the file extension of a file that is not an image file to .jpg, .gif or .png. To that end we have taken a small .pdf file (the contents of which are of no consequence) and have changed its name to fakeimage.jpg. Windows now thinks it's an image file, and so does our HTML upload file. Our PHP script, however, is not so easily fooled. Here's what happens when we try and upload the file:
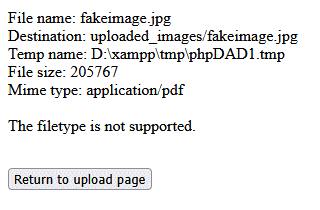
The mime type does not match the file extension
So far, we have uploaded files to a sub-directory within our server's document root directory (either uploads or image_upload). This works perfectly well, but creates a potential security problem because, unless we explicitly limit access to these directories by applying appropriate file permissions, they will be directly accessible to anybody visiting our website. Regardless of whether or not a visitor has malicious intentions, this is not a particularly good state of affairs, because the uploaded files may contain sensitive information.
Ideally, files should be uploaded to a directory that resides outside the server's root directory. We can either create the upload manually or using PHP code. We suggest doing this manually, since using PHP for this purpose (for example, in an upload script) would inevitably involve checking whether the directory already exists each time we run the script. To that end, we could just create a sub-directory in the C:/vhosts/ directory called uploads.
However, it might be time to think a little more carefully about our directory structure. The reason we created the C:/vhosts/myserver/ directory when we set up XAMPP was to maintain a separate root directory for the myserver domain. It allows us to create additional domains in the future, each of which can have their own root directory as a sub-directory of the C:/vhosts/ directory.
If we were to create an upload directory that is intended for use with the myserver domain as a sub directory of C:/vhosts/, we would have to give it a unique name to distinguish it from upload directories intended for use with other domains we might create, perhaps something like C:/vhosts/myserver_uploads/. This is certainly a possibility, but things might get a little messy if we create multiple hosts.
Our suggestion would be to create a subdirectory of C:/vhosts/myserver/ called htdocs, and move all the files and directories currently in the C:/vhosts/myserver/ directory into C:/vhosts/myserver/htdocs. If you choose this option, you need to make a small change to the Apache configuration file httpd-vhosts.conf. In order to do so, take the following steps:
<VirtualHost *:80>
DocumentRoot "c:/vhosts/myserver/htdocs/"
ServerName myserver
<Directory "c:/vhosts/myserver">
AllowOverride All
Require all Granted
</Directory>
</VirtualHost>
<Directory "c:/vhosts/myserver/">
Options Indexes FollowSymLinks MultiViews
AllowOverride all
Order Deny,Allow
Allow from all
Require all granted
</Directory>v
As you can see, we don't need to change very much - just the path to the document root directory. Everything else can stay as it is. We can now create a sub-directory of C:/vhosts/myserver/ to hold uploaded files which will be external to the myserver document root directory and thus not directly accessible to visitors to our website. To this end, create a subdirectory in the C:/vhosts/myserver/ directory called uploads.
The uploads directory will serve as the root directory for any files we upload. We can create as many sub-directories within the uploads directory as we like, which will allow us to organise our uploaded files in any way we see fit. For the moment, we'll stick with uploading image files, so create a sub-directory within the uploads directory called images. We might decide to organise our uploaded image files by category at some point, but let's keep things simple for now.
We only need to make one small change to our image_upload.php script. Replace the following line of code (this is the first line of code in the script):
$upload_dir = "uploaded_images/";
with this:
$upload_dir = "../uploads/images/";
Test the code by opening the image_upload.html page once more in a browser and using it to upload an image file. If everything is working as it should be (and depending on which file you have selected to upload), you should see something like the following illustration in your browser window:
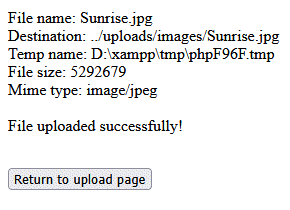
The file was successfully uploaded to the uploads/images folder
If you open the C:/vhosts/myserver/uploads/images directory, you should find your uploaded image there. Trying to access this directory from a browser window, on the other hand, will prove impossible (but you can try! . . . ). This means that our uploaded files will be far more secure than was previously the case. They can only be accessed and manipulated programmatically via a script, or directly by a user with administrative rights on the server.
Before we move on, we can re-instate the restrictions in the image_upload.html file by reversing the changes we made earlier, since we have proved that the PHP script can deal with any files that don't meet those restrictions. Open the HTML file image_upload.html in a text editor and un-comment this line:
<!-- <input type="hidden" name="MAX_FILE_SIZE" value="10485760"/> -->
Now un-comment this line:
<!-- <input type="file" name="upload_image" id="upload_image" accept="image/png, image/jpeg, image/gif" /> -->
And delete this line:
<input type="file" name="upload_image" id="upload_image" />
We have seen that our image_upload.php script will prevent files from being saved to an upload directory on the server if a file with the same name already exists. There are (at least) two ways around this. We can ask the user whether it's OK to overwrite the existing file, or maybe allow them to save the uploaded file with a different filename. Alternatively, we can write code to ensure that each uploaded file has a unique filename.
Ultimately, the approach you take to naming uploaded files will depend upon the nature of your application, and on the kind of clients your application caters to. An examination of every possible scenario is beyond the scope of this article, so for now we're going to restrict ourselves to ensuring that all uploaded files have a unique filename.
There are a number of schemes available for generating unique filenames. One of the most widely used is to generate a Universally Unique Identifier (UUID). A UUID is a 128-bit number used to uniquely identify entities such as files or other resources in a computerised system. It is typically presented as a 36-character alphanumeric string, consisting of five groups of characters separated by hyphens.
The number of possible combinations for a 128-bit string of this nature is 2128, which makes the likelihood of two randomly generated UUIDs being identical infinitesimally small. Using a UUID to randomly generate a filename for an uploaded file therefore virtually guarantees that the filename will be unique on the server.
Unfortunately, PHP does not have a built-in function for generating a UUID. We could of course write our own PHP function to generate a UUID, but that's somewhat beyond the scope of this article. What PHP does have is a built-in function called uniqid() that will allow us to generate a 13-digit time-stamp-based hexadecimal value.
The uniqid() function takes two optional parameters. The first is a prefix of type String that defaults to the empty string (""). The second is a Boolean value that determines whether or not additional entropy is added to the end of the string. By default, this second parameter is set to false. If set to true, it will add an additional 10 characters to the sequence, consisting of a leading zero followed by a decimal point and eight randomly generated decimal digits.
Specifying the prefix argument and setting the more entropy option to true significantly increases the likelihood that the value returned by uniqid() will be unique on the server. Let's incorporate this function in our image upload script to provide our uploaded image files with unique filenames. In the image_upload.php script, replace the following line of code:
$upload_image = $upload_dir . $filename;
with this one:
$upload_image = $upload_dir . uniqid("image_", true);
Test the script by opening the image_upload.html file in a browser and using it to upload a file. You should see something like the following illustration:
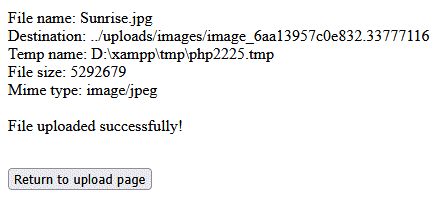
The file was uploaded with a unique filename
Try uploading the same file several times. You should find that it is saved in the /uploads/images/ directory, each time with a different filename. Note that the PHP Group's manual page for the uniqid() function issues the following warning:
"Warning This function does not guarantee the uniqueness of the return value because the value is based on the current time in microseconds or the current time with a small amount of random data appended if more_entropy is true."
However, unless you are planning on uploading multiple files simultaneously, the chances of the same value being returned twice are virtually non-existent. Even if you do upload multiple files simultaneously, setting the more entropy option to true should virtually ensure uniqueness in most situations.
Saving uploaded files on your server with unique server-generated filenames solves the problem of duplicate filenames, but it also presents us with some challenges. For example, how do we retrieve the original filename, and how do we know which user uploaded the file? The filename used to store the file on the server doesn't actually tell us anything about the contents or even the nature of the file.
Of course, we can derive some information from the prefix - assuming one has been assigned, and assuming it is actually meaningful. Our "image_" prefix, for example, gives us a clue as to what kind of file we are dealing with, as does the fact that it is stored in a directory called "images"!
The server will also give the uploaded file a timestamp, so we can determine when the file was uploaded easily enough. We can also determine the file's mime type using the PHP mime_content_type() function. There is no way, however, to retrieve either the original filename, or the name of the user who uploaded the file, from the file itself.
There are of course ways around this problem, virtually all of which involve storing metadata about the file, either in a separate file or, more frequently, in a database. The database will hold a record for each uploaded file containing information about the file, such as the original filename, the date the file was created, the name of the user who uploaded the file, and so on. One field in each record will be used to store the filename used to store the file on the server, and may even be used as a primary key.
Depending on the nature of the uploaded files, how they will be stored, and how they are to be used, it will not always be necessary to generate unique filenames. For example, if a user is assigned a dedicated folder for their uploaded images - one to which only they have access - it might make more sense to keep the original filenames. It then becomes the responsibility of the user to ensure that there are no duplicated filenames. They can also choose whether or not to overwrite existing files.
It is perfectly possible to upload several files from a form in one go. In fact, the only limit on the number of files that can be uploaded in a single request is the value assigned to the max_file_uploads property in the php.ini file (by default this is usually set to 20).
Suppose we want to allow a user to upload multiple image files with a single request. We'll start by creating the HTML upload page. This page will be similar to the previous example in some respects, but it will allow us to select and upload up to five images.
As well as the limit on the number of files we can upload, there are some other constraints. Each image must be no larger than 10 MB, and the total size of the uploaded files combined must not exceed 40 MB. In order to enforce these restrictions, we will be using a significant amount of JavaScript. Here is the code for our upload page:
<!doctype html>
<html lang="en">
<head>
<meta charset="utf-8">
<title>Multiple Image Upload Demo</title>
<style>
h1, p.msg, button.ok { text-align: center; }
p.msg { color: red; }
form {width: 480px; margin: auto; border: solid 1px; padding: 0 1em;}
label {width: 140px; display: inline-block; text-align: right; vertical-align: top; }
button.ok { visibility: hidden; }
</style>
</head>
<body>
<h1>Upload Image Files</h1>
<form method="post" enctype="multipart/form-data" id="frm" name="frm" action="multi_image_upload.php">
<input type="hidden" name="MAX_FILE_SIZE" value="10485760"/>
<p>
Note: you may select up to 5 files - maximum file size: 10 MB.<br><br>
</p>
<p>
<label>Select files to upload:</label>
<input type="file" id="fileInput" name="fileInput[]" multiple accept="image/png, image/jpeg, image/gif">
</p>
<p>
<label></label>
<input type="submit" id="uploadBtn" value="Upload Files"/>
</p>
<p id="errorMsg" class="msg"> </p>
<p class="msg">
<button type="button" class="ok" id="okBtn">OK</button>
</p>
</form>
<script>
const fileInput = document.getElementById("fileInput");
const uploadBtn = document.getElementById("uploadBtn");
const okBtn = document.getElementById("okBtn");
const errorMsg = document.getElementById("errorMsg");
const MAX_FILES = 5;
const MAX_FILE_SIZE = 10485760;
const MAX_TOTAL_MB = 40;
const MAX_TOTAL_BYTES = MAX_TOTAL_MB * 1048576;
frm.addEventListener("submit", checkFiles);
okBtn.addEventListener("click", enableForm);
function clearErr() {
errorMsg.textContent = "\u00A0";
}
function disableForm() {
fileInput.disabled = true;
uploadBtn.disabled = true;
fileInput.value = null;
okBtn.style.visibility = "visible";
}
function enableForm() {
uploadBtn.disabled = false;
fileInput.disabled = false;
clearErr();
okBtn.style.visibility = "hidden";
}
function checkFiles() {
event.preventDefault();
clearErr();
const files = fileInput.files;
if (files.length === 0) {
errorMsg.textContent = "Please select at least one file.";
disableForm();
return;
}
if (files.length > MAX_FILES) {
errorMsg.textContent = "You can only select a maximum of " + MAX_FILES + " files.";
disableForm();
return;
}
for (let i = 0; i < files.length; i++) {
if(files[i].size > MAX_FILE_SIZE) {
errorMsg.textContent = "The file '" + files[i].name + "' exceeds the maximum file size.";
disableForm();
return;
}
}
let totalSize = 0;
for (let i = 0; i < files.length; i++) {
totalSize += files[i].size;
if (totalSize > MAX_TOTAL_BYTES) {
errorMsg.textContent = "Total upload size exceeds " + MAX_TOTAL_BYTES + "MB.";
disableForm();
return;
}
}
this.submit();
}
</script>
</body>
</html>
The first thing to note here is the HTML <input> element we are using to select our files:
<input type="file" id="fileInput" name="fileInput[]" multiple accept="image/png, image/jpeg, image/gif">
The name attribute now refers to an array, and we have set the multiple attribute to enable multiple files to be selected. This means that, when the form data is submitted and uploaded to the server, the resulting $_FILES superglobal will be a three-dimensional array rather than the two-dimensional array we have seen previously. Each array element is a two-dimensional array of key-value pairs in which the key is the name of a file and the value is one of that file's attributes (name, type, size, and so on).
The JavaScript code is essentially dedicated to validating the HTML form. It ensures that only the maximum number of files (five) is selected, that no file exceeds the 10 MB size limit, and that the total size of the uploaded files does not exceed 40 MB. Hopefully, most of the JavaScript code will be self-explanatory (if you are not too familiar with JavaScript and want to gain a deeper understanding of the code, you might find our "Introduction to JavaScript" section helpful).
Copy and paste the code above into a new text file and save it as multi_image_upload.html in your server's document root directory. Open the new page by typing the URL http://myserver/multi_image_upload.html into the address bar of your web browser (if you have called your server something different, amend the URL accordingly). You should see something like the illustration below.
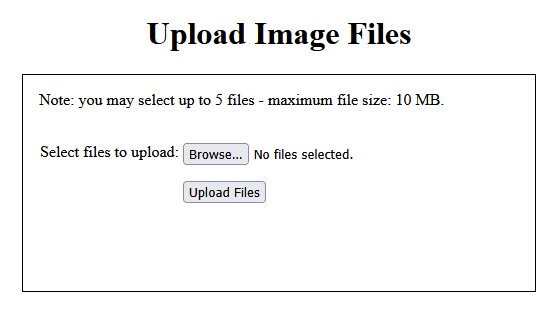
The new image upload page
Although you can browse and select image files to upload, you can't actually upload any files because we haven't written the upload script yet, so let's do that now. The script will have similar functionality to the upload scripts we have written previously. The main difference is that this time we are dealing with multiple files instead of just one. Here is the code:
<?php
$upload_dir = "../uploads/images/";
$maxFileSize = 10485760;
$types = array("image/jpeg", "image/gif", "image/png");
$errors = array();
$files = array();
$counter = 0;
echo "<h1>File Upload Results</h1>";
foreach($_FILES["fileInput"]["tmp_name"] as $key=>$tmp_name){
$temp = $_FILES["fileInput"]["tmp_name"][$key];
$name = $_FILES["fileInput"]["name"][$key];
$mime_type = mime_content_type($_FILES["fileInput"]["tmp_name"][$key]);
if(empty($temp)) {
break;
}
$counter++;
$upload = true;
if($_FILES["fileInput"]["size"][$key] > $maxFileSize) {
$upload = false;
array_push($errors, $name." exceeds the maximum permitted file size (10 MB).");
}
if(!in_array($mime_type, $types)) {
$upload = false;
array_push($errors, $name." has an invalid file type.");
}
if(file_exists($upload_dir."/".$name) == true){
$upload = false;
array_push($errors, $name." already exists.");
}
if($upload == true){
move_uploaded_file($temp, $upload_dir . $name);
array_push($files, $name);
}
}
if($counter>0){
if(count($errors)>0) {
echo "<h2>Errors:</h2>";
foreach($errors as $error) {
echo $error . "<br>";
}
}
if(count($files) > 0) {
echo "<h2>Uploaded Files:</h2>";
foreach($files as $fileName) {
echo $fileName . "<br>";
}
echo "<br>" . count($files) . " file(s) successfully uploaded.<br>";
}
}
?>
<br>
<form method="POST" action="multi_image_upload.html">
<p>
<input type="submit" value="Return to upload page" />
</p>
</form>
Copy and paste the code above into a new text file and save it as multi_image_upload.php in your server's document root directory, then open the HTML file multi_image_upload.html in a browser by typing the URL http://myserver/multi_image_upload.html into the address bar of your web browser as you have previously. Select up to five image files, and click on the Upload Files button. Depending on which files you selected, you should see something like the following illustration:
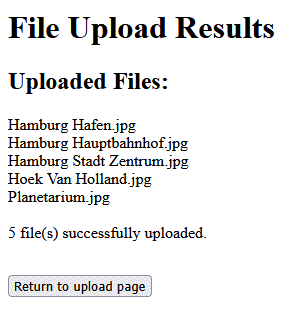
We have successfully uploaded five image files
If you check your C:/vhosts/myserver/uploads/images directory, you should find your uploaded images there. The script will also detect and report upload errors, such as files that are uploaded as image files but are found to have the wrong mime type. For example:
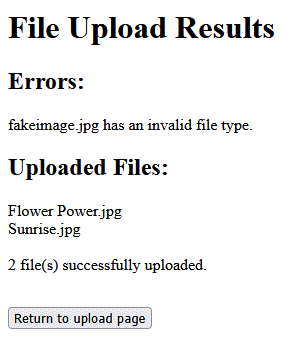
The script will also detect and report file upload errors
There are many ways in which we could develop and improve both the HTML upload page and the PHP upload script to provide additional functionality, as you can probably imagine. We could, for example, allow the user to preview the images before they upload them, to or display the uploaded images, gallery-style, after a successful upload. However, we leave further development in this respect to the interested reader.
We have seen how we can catch most files that could cause a problem using client-side validation. Any files that do get past the client-side code are usually handled by the PHP script on the server. Keep in mind, however, that any files that are uploaded from a client are only seen by the PHP script after they have reached the server.
A file can be rejected by the server before it ever gets to a script for several reasons. It might, for example, exceed the maximum size allowed for uploaded files (upload_max_filesize). It might be part of a multiple file upload that exceeds the maximum number of files that can be uploaded simultaneously (max_file_uploads), or that exceeds the maximum amount of data that can be sent to the server via a single HTTP request (post_max_size).
There are other situations in which a file upload can cause problems, such as a file upload that has been interrupted for some reason, causing loss of data. In all of these scenarios, the server will generate an error message or a warning that will, unless intercepted, be displayed in the client browser window, which is hardly a desirable state of affairs, as it can have a negative impact on the user experience.
You may remember that one of the elements in the $_FILES superglobal array is the key value pair $_FILES["upload_file"]["error"], which contains an error code generated by the server and assigned to the file that has caused the error to occur (we listed the upload error codes generated by the server, together with a brief description of their meaning in the table "PHP File Upload Error Codes" earlier in this article).
With that in mind, we're going to create a basic upload HTML page that has virtually no checks and balances. It will allow us to select as many files as we like, of whatever type we like, and attempt to upload them. We'll also create a new upload script to deal with upload errors. Here is the code for the new upload page:
<!doctype html>
<html lang="en">
<head>
<meta charset="utf-8">
<title>Errors Demo</title>
<style>
h1 { text-align: center; }
form {width: 480px; margin: auto; border: solid 1px; padding: 0 1em;}
label {width: 140px; display: inline-block; text-align: right; vertical-align: top; }
</style>
</head>
<body>
<h1>Errors Demo</h1>
<form method="post" enctype="multipart/form-data" id="frm" name="frm" action="errors_demo.php">
<input type="hidden" name="MAX_FILE_SIZE" value="10485760"/>
<p>
<label>Select files to upload:</label>
<input type="file" id="fileInput" name="fileInput[]" multiple>
</p>
<p>
<label></label>
<input type="submit" id="uploadBtn" value="Upload Files"/>
</p>
</form>
</body>
</html>
Copy and paste the code above into a new text file and save it as errors_demo.html in your server's document root directory. Open the new page by typing the URL http://myserver/erros_demo.html into the address bar of your web browser (if you have called your server something different, amend the URL accordingly). You should see something like the illustration below.
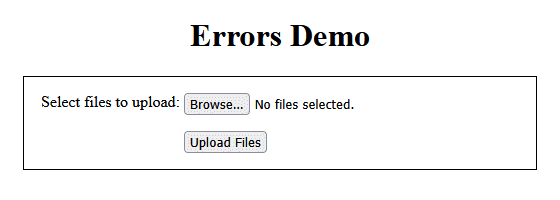
The errors_demo.html upload page
Now for the download script. The script will process all of the files it is sent in a single HTTP POST request unless the number of files or the total amount of form data exceed the limits set by the max_file_uploads and post_max_size properties in the php.ini file, respectively, although the way these two scenarios are handled is different, as we will see. Here is the code:
<?php
$upload_dir = "../uploads/";
$errors = array();
$files = array();
$counter = 0;
echo "<h1>Upload Error Check Results</h1>";
if(!$_FILES) {
echo 'The $_FILES array is empty.<br>';
}
else {
foreach($_FILES["fileInput"]["tmp_name"] as $key=>$tmp_name) {
$temp = $_FILES["fileInput"]["tmp_name"][$key];
$name = $_FILES["fileInput"]["name"][$key];
$err = $_FILES["fileInput"]["error"][$key];
if($err > 0) {
switch ($err) {
case 1:
array_push($errors, $name." - exceeds the upload_max_filesize directive in php.ini.");
break;
case 2:
array_push($errors, $name . " - exceeds the MAX_FILE_SIZE directive that was specified in the HTML form.");
break;
case 3:
array_push($errors, $name . " - file was only partially uploaded.");
break;
case 4:
array_push($errors, "No file was selected for upload.");
break;
case 6:
array_push($errors, $name . " - missing a temporary folder.");
break;
case 7:
array_push($errors, $name . " - failed to write file to disk.");
break;
case 8:
array_push($errors, $name . " - a PHP extension stopped the file upload.");
break;
default:
array_push($errors, $name . " - unknown upload error.");
break;
}
}
else {
$counter++;
move_uploaded_file($temp, $upload_dir . $name);
array_push($files, $name);
}
}
if(count($errors) > 0) {
echo "<h2>Errors:</h2>";
foreach($errors as $error) {
echo $error . "<br>";
}
}
if(count($files) > 0) {
echo "<h2>Uploaded Files:</h2>";
foreach($files as $fileName) {
echo $fileName . "<br>";
}
echo "<br>" . count($files) . " file(s) successfully uploaded.<br>";
}
}
if(!$counter > 0) {
echo "<br>No files were uploaded.<br>";
}
?>
<br>
<form method="POST" action="errors_demo.html">
<p>
<input type="submit" value="Return to upload page" />
</p>
</form>
Copy and paste the code above into a new text file and save it as errors_demo.php in your server's document root directory, then open the HTML file errors_demo.html in a browser by typing the URL http://myserver/errors_demo.html into the address bar of your brower. Before we do anything else, let's just run through what the code does.
The first thing we do is to specify the upload directory we are targeting and define some variables to hold information about the files we are attempting to upload and any errors that occur:
$upload_dir = "../uploads/";
$errors = array();
$files = array();
$counter = 0;
The $upload_dir variable tells the script to use the C:/vhosts/myserver/uploads directory as the destination for successfully uploaded files. The $errors array holds messages generated by the script informing the user of any problems encountered with specific files, and the $files array holds the names of any files that are actually uploaded to the server. The $counter variable will keep a tally of the number of files uploaded.
The next significant piece of code will check to see whether the $_FILES superglobal actually contains any information:
if(!$_FILES) {
echo 'The $_FILES array is empty.<br>';
}
If the $_FILES array is empty it almost certainly means that the server rejected the upload because the total amount of form data we attempted to upload exceeded the maximum specified by the post_max_size property in the php.ini file. If that is the case, the user sees the message telling them that the array is empty and the entire block of code in the else clause that follows the if statement is ignored.
If the $_FILES array is not empty, the code within the else clause is executed, and a foreach loop is used to iterate through the array elements, each of which represents a single file upload. The $temp, $name and $err variables are used to store the file's temporary filename on the server, its filename on the client computer, and the error code assigned to it:
else {
foreach($_FILES["fileInput"]["tmp_name"] as $key=>$tmp_name) {
$temp = $_FILES["fileInput"]["tmp_name"][$key];
$name = $_FILES["fileInput"]["name"][$key];
$err = $_FILES["fileInput"]["error"][$key];
.
.
.
For each file whose error code is greater than zero, a swich statement is used to determine which type of error has occurred, and an error message identifying the file using its original name, and describing the error, is pushed to the $errors array. If the error code is zero (no errors), the $counter variable is incremented by one, the file is moved to the ../uploads/ directory, and the filename is pushed to the $files array.
if($err > 0) {
switch ($err) {
case 1:
array_push($errors, $name." - exceeds the upload_max_filesize directive in php.ini.");
break;
case 2:
array_push($errors, $name . " - exceeds the MAX_FILE_SIZE directive that was specified in the HTML form.");
break;
case 3:
array_push($errors, $name . " - file was only partially uploaded.");
break;
case 4:
array_push($errors, "No file was selected for upload.");
break;
case 6:
array_push($errors, $name . " - missing a temporary folder.");
break;
case 7:
array_push($errors, $name . " - failed to write file to disk.");
break;
case 8:
array_push($errors, $name . " - a PHP extension stopped the file upload.");
break;
default:
array_push($errors, $name . " - unknown upload error.");
break;
}
}
else {
$counter++;
move_uploaded_file($temp, $upload_dir . $name);
array_push($files, $name);
}
The first if statement following the completion of the first foreach loop checks to see if there are any entries in the $errors array. If so, a second foreach loop is used to iterate through the $errors array and display its contents. Similarly, the next if statement checks to see if there are any entries in the $files array, and if so, displays its contents using a foreach loop:
if(count($errors) > 0) {
echo "<h2>Errors:</h2>";
foreach($errors as $error) {
echo $error . "<br>";
}
}
if(count($files) > 0) {
echo "<h2>Uploaded Files:</h2>";
foreach($files as $fileName) {
echo $fileName . "<br>";
}
echo "<br>" . count($files) . " file(s) successfully uploaded.<br>";
}
The final if statement checks the value of the $counter variable, and if it is found to be zero displays the message "No files were uploaded."
In order to demonstrate the kind of thing that can happen when we run the script, we have created a directory containing a collection of 24 files with different mime types, and varying considerably in size, which we will use to test our upload script. Here is a screenshot of the directory as seen by Windows Explorer:
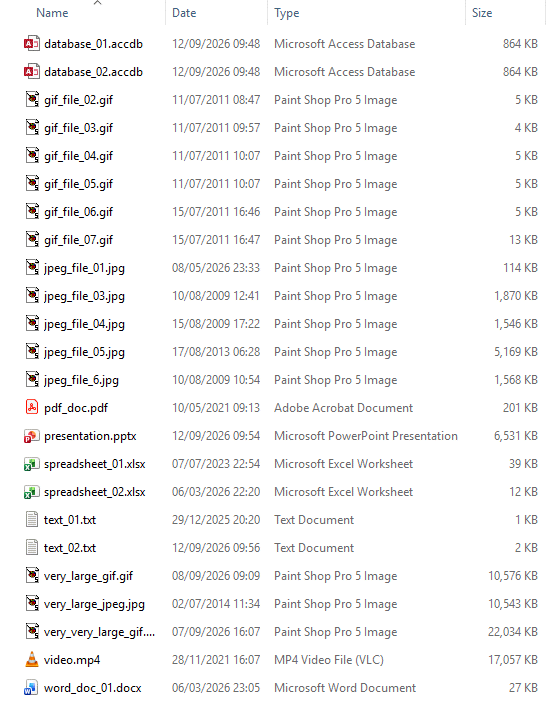
The directory contains files of various types occupying a total of 77.1 MB
Note that, for the purposes of this exercise, we have temporarily set the display_errors property in the php.ini file to Off in order to suppress error messages and warnings generated by the server (by default, this property should be set to On during development as it is useful when debugging, but should be set to Off in a production environment). This is what happens if we try to upload all of the files at once:
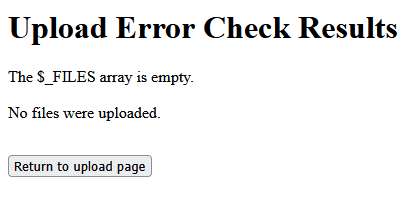
If we try to upload all the files, nothing is uploaded
With all of the files selected, the amount of form data exceeds the limit set by the post_max_size property in the php.ini file (40 MB). Consequently, no files are uploaded and no entries are generated for the $_FILES array.
Suppose we attempt to upload all but the two largest files (very_very_large_gif.gif and video.mp4), which reduces the number of files to 22 and the total amount of form data to 39 MB. Here's what happens:
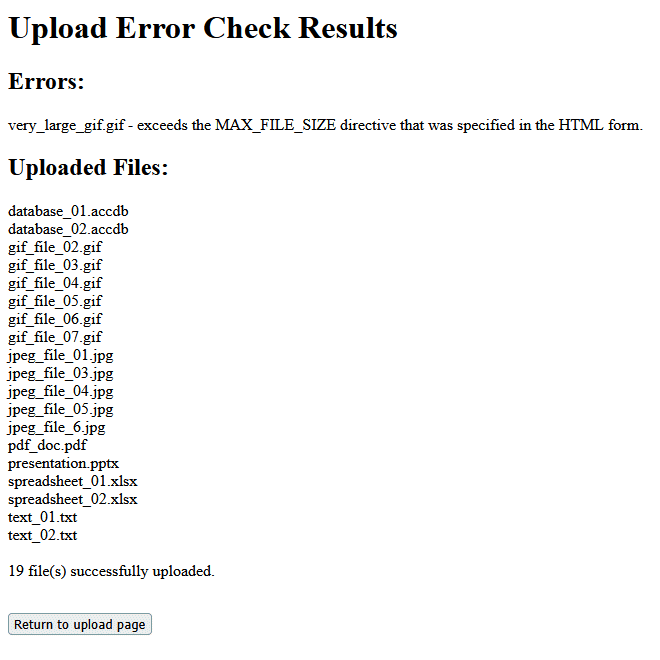
Nineteen files are uploaded and one is rejected
The script has correctly detected that the size of the file very_large_gif.gif has exceeded the maximum file size specified in the HTML upload form (10 MB). Another 19 files have been successfully uploaded. That leaves two files unaccounted for. What happened to these files?
By default, the number of files that may be uploaded in a single request is set by the max_file_uploads property in the php.ini file, which has a default value of 20. We have exceeded this limit because we attempted to upload 22 files, but the server does not react in the same way as it did when we exceeded the restriction set by post_max_size.
This time, PHP will process the upload request, but if the maximum number of files specified by max_file_uploads is exceeded, it will stop processing files once the limit has been reached. The remaining files are effectively ignored, and the $_FILES array is truncated. The two files missing in this case are very_large_jpeg.jpg and word_doc_01.docx - the last two files in the selection.
Note that even with the display-errors property set to On in the php.ini file, when the number of files exceeds the specified limit, your script will still execute and the server does not generate any error or warning messages, making it hard to detect that files are missing unless you check for missing files in your code. Note that PHP processes the uploaded form data before it runs your script, so even if you can detect that files are missing, your script can't take pre-emptive action.
One final thing to note is that, if you click on the Upload button without selecting any files (bearing in mind that we aren't carrying out any checks in the errors_demo.html file), the HTTP post request will still be generated and the errors_demo.php script will run. Error code 4 will be generated, and you will see the following result:
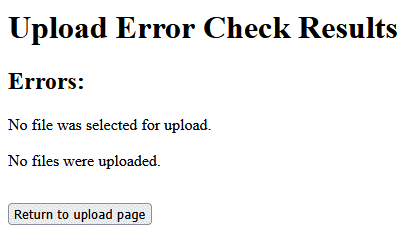
The result of clicking Upload without selecting a file
Server security is a very broad topic, much of which is well beyond the scope of this article because it necessarily involves a detailed discussion of server administration. Nevertheless, we have already seen some of the simple measures that can be taken to ensure the validity of uploaded files and prevent unauthorised access to potentially sensitive data.
We have stated, for example, that the final destination for uploaded files - assuming they are to be stored on the server - should be a directory outside the server's document root directory in order to ensure that the uploaded files cannot be accessed directly from the web. Other measures, which can be implemented, both at the client end and on the server, include restricting the type, number, and size of the files that can be uploaded.
Restricting the type of file that can be uploaded at the client end - and checking that the file is actually what it appears to be when it reaches the server - is a fairly obvious security measure to take because it prevents the uploading of executable files that may contain malicious code, even if a hacker has manipulated the file extension in an attempt to bypass filetype restrictions.
Restricting file size, together with limiting the number of files that can be uploaded simultaneously, can reduce the risk of denial-of-service attacks. These are essentially crude "brute-force" attacks in which the attacker attempts to overwhelm a server by flooding it with a high-volume of upload requests. The idea is to create a drain on the server's resources, preventing it from responding effectively to legitimate service requests.
Attempting to execute malicious code remotely through the medium of file uploads is popular with attackers for the simple reason that file upload features are found in so many modern web applications. The attacks take advantage of weaknesses in server-side code that fails to properly validate the uploaded files, or a server configuration that does not sufficiently restrict access to sensitive data.
One additional measure we can implement within our PHP code which we have not so far mentioned is to use PHP's is_uploaded_file() function, which checks to see whether or not a file has been uploaded via an HTTP POST request. The function accepts a single argument - the name of the file to be checked - and returns true or false, depending on whether or not the named file was uploaded via HTTP POST.
Note that the filename supplied to is_uploaded_file() as its argument must take the form $_FILES["userfile"]["tmp_name"], i.e. the randomly-generated filename assigned to the file by the server while it's in temporary storage. The following code creates a simple upload page similar to those we have seen before, but with no bells or whistles:
<!doctype html>
<html lang="en">
<head>
<meta charset="utf-8">
<title>Is Uploaded Demo</title>
<style>
h1 { text-align: center; }
form {width: 480px; margin: auto; border: solid 1px; padding: 0 1em;}
label {width: 160px; display: inline-block; text-align: right; vertical-align: top; }
</style>
</head>
<body>
<h1>Is Uploaded Demo</h1>
<form method="post" enctype="multipart/form-data" id="frm" name="frm" action="check_uploaded.php">
<p>
<label>Select a file to upload:</label>
<input type="file" id="upload_file" name="upload_file" accept="text/plain">
</p>
<p>
<label></label>
<input type="submit" id="uploadBtn" value="Upload File"/>
</p>
</form>
</body>
</html>
Copy and paste the code above into a new text file and save it as check_uploaded.html in your server's document root directory. Open the new page by typing the URL http://myserver/ check_uploaded.html into the address bar of your web browser. You should see something like this:
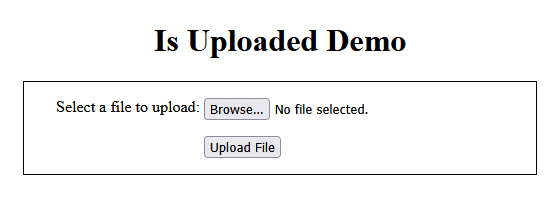
The check_uploaded.html upload page
Now we'll create the corresponding PHP upload script:
<?php
$filename = basename($_FILES["upload_file"]["name"]);
$tmpname = $_FILES["upload_file"]["tmp_name"];
if(is_uploaded_file($tmpname)) {
echo "The file <em>$filename</em> was uploaded successfully.<br><br>";
echo "Contents of <em>$filename</em>: <br><br>";
readfile($tmpname);
}
else echo "The file was not uploaded via an HTML POST request.";
?>
<br>
<form method="POST" action="check_uploaded.html">
<p>
<input type="submit" value="Return to upload page" />
</p>
</form>
Copy and paste the code above into a new text file and save it as check_uploaded.php in your server's document root directory, then open the HTML file check_uploaded.html in a browser once more, select a file to upload, and click on the Upload File button. This is what we saw when we selected and uploaded a legitimate text file called latin.txt from local storage on the client machine:
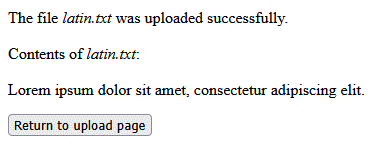
The flie latin.txt was uploaded via an HTML POST request
This is the result we expected to see, considering that the latin.txt file was uploaded via an HTTP POST request. Now consider the possibility that an attacker could somehow replace the temporary filename passed to the script with a different filename in order to gain access to sensitive data or system files. To demonstrate, we can alter the code in our check_uploaded.php file to simulate an attack of this nature, like this:
<?php
$filename = basename($_FILES["upload_file"]["name"]);
// a hypothetical attack replaces the original temporary filename
$_FILES["upload_file"]["tmp_name"] = "../../../xampp/php/php.ini";
// end of incursion
$tmpname = $_FILES["upload_file"]["tmp_name"];
if(is_uploaded_file($tmpname)) {
echo "The file <em>$filename</em> was uploaded successfully.<br><br>";
echo "Contents of <em>$filename</em>: <br><br>";
readfile($tmpname);
}
else echo "The file was not uploaded via an HTML POST request.";
?>
<br>
<form method="POST" action="check_uploaded.html">
<p>
<input type="submit" value="Return to upload page" />
</p>
</form>
If we now try uploading our latin.txt file, we will see something like this:
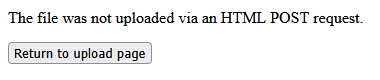
The file was not uploaded via an HTML POST request
How does the is_uploaded_file() function determine that $tmpname does not refer to a legitimately uploaded file? In simple terms, it relies on the fact that the server maintains a dedicated hash table of uploaded file paths that is updated during each multipart HTTP POST file upload. When called, the function checks the hash table for an entry corresponding to the filename passed to it. If such an entry exists, it returns true, otherwise it returns false.
Now let's see what happens when we don't bother to use the is_uploaded_file() function in our script. The code now looks like this:
<?php
$filename = basename($_FILES["upload_file"]["name"]);
// a hypothetical attack replaces the original temporary filename
$_FILES["upload_file"]["tmp_name"] = "../../../xampp/php/php.ini";
// end of incursion
$tmpname = $_FILES["upload_file"]["tmp_name"];
echo "The file <em>$filename</em> was uploaded successfully.<br><br>";
echo "Contents of <em>$filename</em>: <br><br>";
readfile($tmpname);
?>
<br>
<form method="POST" action="check_uploaded.html">
<p>
<input type="submit" value="Return to upload page" />
</p>
</form>
If we now attempt to upload the latin.txt file once more (or virtually any other file for that matter), we will see something like the following:
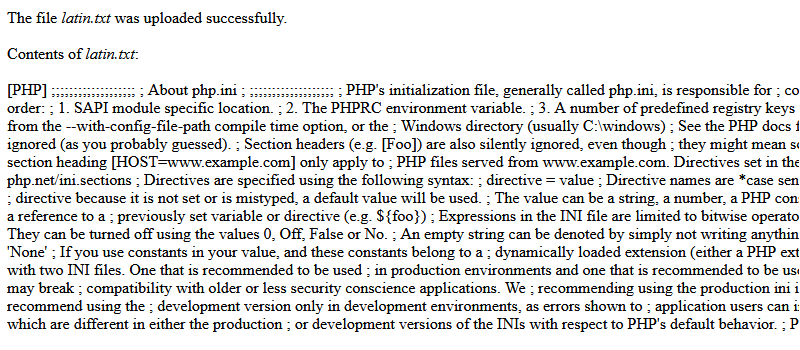
The attacker now has access to the php.ini file!
The attacker now has access to the entire contents of our server's php.ini file, which is obviously a very serious security breach that could lead to all kinds of mischief. We're not going to comment further on the likelihood of such an attack occurring. It is certainly not inconceivable, although it might not go down as we have described here. We merely present this example in order to alert you to a potential vulnerability, and how it can be countered.
One further thing to note here is that the move_uploaded_file() function carries out exactly the same checks as the is_uploaded_file() function before moving a file from its temporary location to its final destination on the server. The general concensus seems to be that if the uploaded file is to be moved to its permanent location on the server immediately after upload using move_uploaded_file(), calling is_uploaded_file() is unnecessary (although not everybody agrees on this point).
We definitely should call is_uploaded_file() if the uploaded file is not being moved to permanent storage immediately after it is uploaded, and is being processed in some other way, even if it will be moved to permanent storage once that processing has been completed.